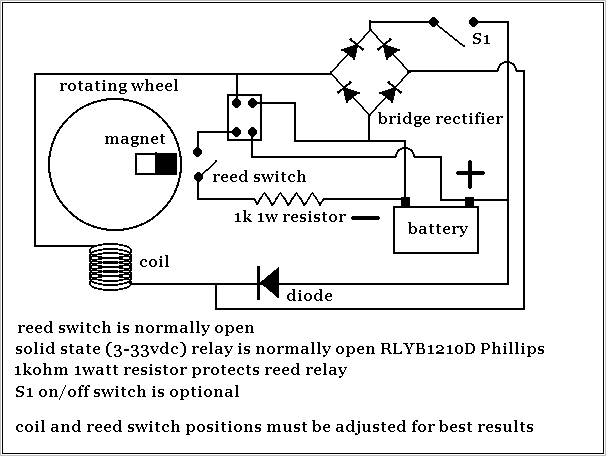
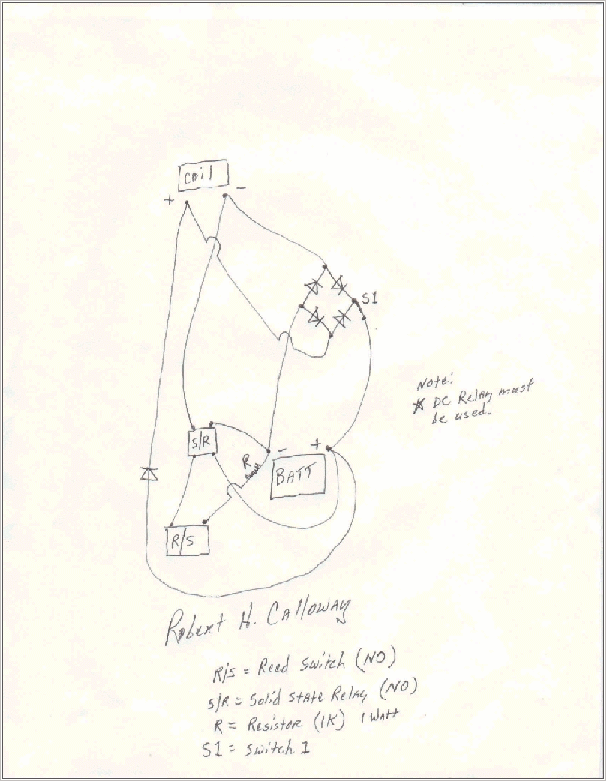
Calloway High Efficiency motor and collector circuit
courtesy of Robert H. Calloway
BUILD THIS ADAMS TYPE MOTOR AT YOUR OWN RISK!
This circuit is a design used by Robert Calloway based on the principles of his design and the Adams design. It is also a 12 volt system, using a 4 ah (amp hour) gel cel battery.
Here is the redrawn circuit that Robert so kindly shared. He indicates it will allow collection of sufficient energy from a rotating magnet arrangement as to provide 1 Watt of excess energy above and beyond what it takes to recharge the battery.
If you choose to experiment with such devices and wish to share your findings, advice or any anomalies, please direct your comments to Robert Calloway or to the energy 21 newsgroup as below.
The battery is a 9 volt DC transistor battery. The S1 switch gives you the option of whether or not you want to recharge the battery.
I'm not sure why you would want to do that other than to DRAIN a fully charged battery by seeing how long the motor would run without recharging.
Then replace the battery with a new one, then switch the charging circuit on and see how much longer the motor runs WITH RECHARGING.
Note: you will have to experiment with the number of magnets and coils as well as their placement to achieve the best operation.
The single diode is the 6 amp blocking type. Probably a overkill, but I got it at work. The bridge is a 400 volt @ 2 amps. The coils are 370 turns of #19 magnetic wire. The cores are very important.
For the fellow just starting out for a easy put together motor, use 5/16 mild steel bolts by 2 inches long. Check these bolts with a magnet, make sure they do not retain magnetism. Wrap the shoulder of the bolt with one layer of electrical tape.
Find some leftover plexiglass somewhere and take a 2 inch hole saw and cutout 2 plugs per coil. Slide one of the plugs on to the bolt to the head, them slide the other one on to the shoulder of the bolt. Having your shoulder of the bolt wrapped to protect the wire, start winding.
Make sure you wind both coils in the same direction. The resistance in the coil is about 00.6 to 00.7 ohms.
The threaded portion of the now made coil can be used for easy mounting. For the serious builder use mild steel filings mixed with epoxy for the cores. This must be a heavy mix of metal with the epoxy. A plastic spool with about a 5/16 hollow center works good with this application.
However, it is my first prototype. Different coils and timing were used then. This picture is not what I use now. But it may help, your choice.
I am also concerned with folks that are trying to build a motor and really don't know a lot about circuits or using plain common sense.
I also recommend the air gap between the magnet and stator coils be no closer than 5/32 starting out for safety. Get timing adjusted, get use to the motor, then play with the air gap. This motor can do some strange things with a close air gap. The scope and meters won't make sense at times. Oh well.. I wont get into that for now..
I place the reed switch down on the base of the motor now, and let the rotor magnets activate it. This does away with the complicated timing stuff on the end of the shaft. When I get the funds together.. My dream is to build a 16 pole motor that uses 8 stator coils. It will be a twin disk rotor that utilizes both ends of the stator coils. Should be a hoss..on paper anyhow.
Almost forgot.. Keep the pulses short from the reed switch. One can move the reed switch around on the base to achieve this. If you have got the pulses as short as you can get, and need them shorter? Place a piece of thin iron between the reed and the magnets. Remember..if your pulses are a fraction too long, this is wasted energy.
You can also add 2 extra magnets to the rotor for more power to the rotor shaft, place them at 90 degrees apart. Remember that poor reed switch will be working 4 times per revolution then.
The 2 stator coils should be hooked up in parallel, but it will work hooked up in series.
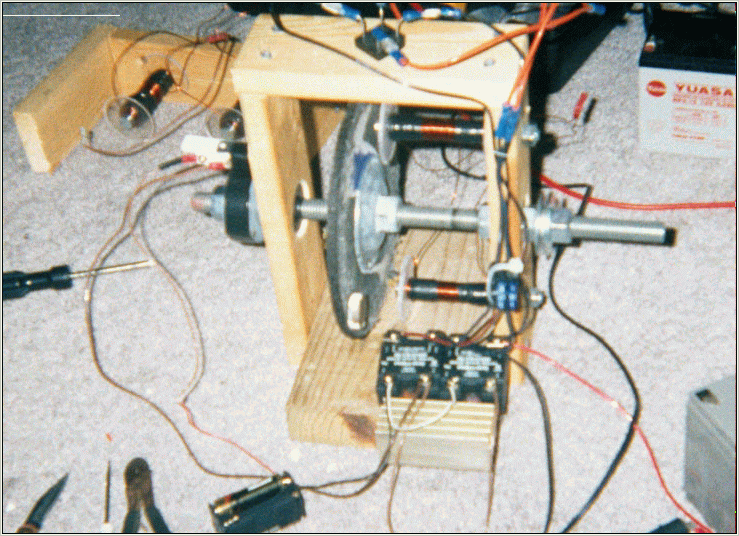
One very important thing. The rotor flywheel. Mine is a 7 1/4 inch grinding disk rated for 8400 rpm. The weight is 7 lbs with the magnets glued to it. Do not use field coils on the rim to collect current! This is a BIG no- no.
The flywheel effect must be used with this design. Use the rotor shaft to drive a generator instead. A 5/8 all thread shaft will screw right through the grinding disk with a nut to lock it in place. Then it is very easy to adjust magnet to stator gap with this setup.
THE HAMSTER CAGE MAGNETIC MOTOR also by author of this article.
Regards,Robert H. Calloway
Other Adams motor type articles
adams type motor
another experimenter's comments
The major portion of this web page has been copied from The Keelynet website check them out at
Keelynet
email the owner of Keelynet Jerry Decker