

email supplier of this article for any additional information
Curiosity & Freedom - Mother's of invention My dream of breaking out of the system and keeping money in my own wallet, instead of padding that of the gas/car companies led me to start thinking about improving gas mileage. Having a background as a chemistry teacher in a small Christian school gave me the knowledge that Hydrogen is very common and burns very well. I therefore wondered why I could not make a car run off of Hydrogen. Upon researching, I found several hydrogen vehicles have already been constructed. Most of them have never been widely publicised. Since hydrogen does not give off toxic waste products when burned, I wondered why auto makers have never pursued this option. Do they really care about the environment as they claim to? The only answer I could come up with was the controlling stock oil companies have invested in the auto industry. However, one day while watching the TV, I did see where one car manufacturer was planning production of a Hydrogen burning automobile and envisioned Hydrogen stations around the country instead of gasoline stations. The cost of manufacturing the prototype car they has was only (!) $500,000. They were trying to find a way to bring the cost down. The car contained at least three 'hydrogen cells' that each cost $100,000 each to manufacture and were essential to the design of the car. The thought of Hydrogen stations angered me why? Because water is made of H20 - two parts Hydrogen to one part Oxygen. I thought there had to be a way to liberate and burn the Hydrogen. The way to liberate the Hydrogen was a simple classroom experiment in electrolysis. Take a nine volt battery, attach a wire to each terminal, put a small amount of salt in a cup of water (to assist the electrical current flow), and put the ends of the wires in the cup. You will notice that on the wire attached to the positive terminal, many bubbles appear. On the wire attached to the negative terminal, some bubbles appear, but fewer than the positive side. You have just split the water, Hydrogen and Oxygen, apart and liberated them into a gas. A Simple Science Lesson A theory of how electrolysis works is simple. For the sake of all reading this, I will assume nothing is known of how molecules and atoms work. All substances known to man are made of atoms which can be pictured (although modern science has shown this picture to be false, we still use it since it still can adequately describe most observable reactions atoms undergo) as having a central core made of tiny balls stuck together in a clump This clump is called the nucleus and is made of protons (these are positively charged) and neutrons (which have no electrical charge). We find other small balls (called electrons - these have a negative charge) orbiting the nucleus much as the moon orbits the earth. These 'orbits' (called energy shells and/or orbitals) are different energy levels the electrons can exist in. The orbital closest to the atom can hold only two electrons at one time. The next orbit out can hold eight electrons at one time. When you put an atom of Oxygen together with two Hydrogen atoms, what is termed one molecule' of water results. All water is made up of molecules. We really do not understand why, when these atoms come together in this form, the resulting substance takes on the properties it does (why is water wet, transparent, etc.?), but we do understand somewhat of how they 'stick together.' An Oxygen molecule has its lower orbital filled with two electrons, however it naturally occurs with only 6 electrons in its outer orbital. Since atoms always seek to have their orbitals filled to capacity, the Oxygen is seeking two more electrons. Hydrogen has only one proton and one electron. This means that because it has only one electron in one orbital, it seeks another electron so its orbital is at its maximum capacity of two electrons. When an Oxygen atom meets a Hydrogen atom, both decide to share an electron. This means the Hydrogen now has the two electrons it desires, but the Oxygen still is short by one electron. Along comes another Hydrogen who wants to share with the Oxygen. Both Hydrogens now have two electrons in their orbital and the oxygen has its outer orbital filled to its capacity with eight electrons. The atoms are now have what is termed a' covalent' (or electron-sharing) bond between them. Now that all the atoms are content, we have a water molecule. Getting back to the experiment: When we apply electricity to this covalent bond, its breaks. This procedure is called electrolysis. As the covalent bond is broken, the Oxygen naturally migrates to the positive electrode. This is probably due to when the covalent bonds are broken, the Oxygen ends up keeping the electrons from the Hydrogen atoms and therefore has two extra electrons. Since electrons, by nature, carry a negative charge, the Oxygen now has an overall charge of -2. Because opposite charges attract one another, the Oxygen migrates to the positive electrode. Since it seems the Hydrogen has lost its electron, it is left with the positive charge from the proton. Therefore its overall charge of + 1 makes it migrate to the negative electrode. Oxygen and Hydrogen gases both consist of 'diatomic (two-atom)' molecules and therefore can be termed 'diatomic' gases. Each molecule of Oxygen is made of two Oxygen atoms bonded together. Each molecule of hydrogen gas is made of two atoms of Hydrogen bonded together. Keeping this in mind, when enough Oxygen atoms arrive at the positive electrode, they combine in pairs and form Oxygen gas. The same happens to the Hydrogen atoms arriving at the negative terminal, the atoms pair and form hydrogen gas. This brings us to one of the benefits of using water as our substance that we obtain Hydrogen from the Oxygen that is produced is also a very reactive gas. So by using this electrolysis unit, more dynamic combustion happens. Therefore less fuel is used. Now that I had this concept to use, the other problem I faced was how to make enough of the gases so that it would actually make a difference in gas mileage. Another friend of mine told me it would take a truck sized piece of equipment being hauled around behind the car to make enough Hydrogen to burn. I did not believe it would be that hard. By the addition of various substances to water, the volume of gases produced increases. I first though of salt, but this corrodes the electrodes too fast. The solution (pun intended) was to use small amounts of car battery (sulfuric) acid (which is made of two Hydrogen, one Sulfur, and four Oxygen atoms). I hastily constructed a device, using a large pickle jar, whereby I could test how much acid and water needed to be mixed. Using a battery charger, the gallon pickle jar, and 1/4 cup of used battery acid, my electrodes started bubbling like I had put an Alka-seltzer tablet in the tank. I constructed a device such as described in the "Let's Build It" section and found I greatly increased my mileage.
The first vehicle this system was on was a 1985 AMC Jeep. The vehicle belonged to a friend of mine who was developing this system at the same time I was. He got an astounding 60-70 mpg highway and 40-50 mpg city.
My first few personal tests were on a 1983 AMC Eagle SX4 4WD. The problem was that the car was in a bad enough state of repairs that I never had a consistent period of time to test it on. The one time I did test it on a long trip, I forgot to read the odometer when I arrived at my destination! The only fact I can give concerning the mileage was that I drove from Erie, PA to Hagerstown, MD on approximately one half of a tank of gas.
I drove 357 miles using a minimum 9 gallons of gasoline (my tank registered just below the halfway mark). This would figure to 39.7 mpg. Even figuring the use of 10 mpg means I made 35.7 mpg. My Eagle normally got 15 mpg highway! I know on this trip I had to have been getting at least 35 mpg. But where was the 60 mpg highway that my friend's Jeep had obtained? Our engines were identical and yet I got lower mileage.
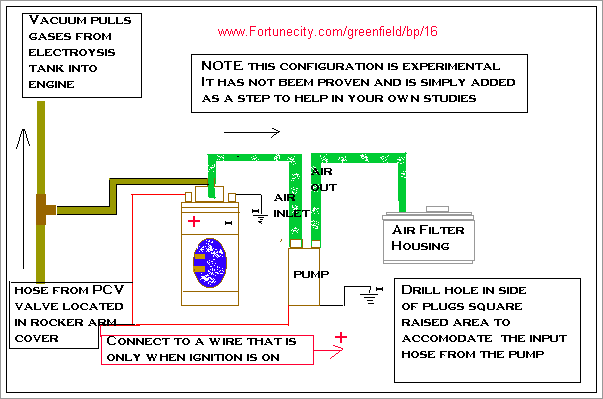
The only difference I could find was that he had used his air conditioning pump to force the produced gases into the top of his air filter. I had thought instead of sacrificing the air conditioner, I would cut the line from the PVC valve to the carburetor, insert a T-connector, and allow the vacuum from the engine to suck the gases in. I discovered that using a pump to force the gases into the engine seems to work better.
The second test I used it on for a long trip in my Eagle also was botched up. I had changed from galvanised bolts to bolts labelled 'zinc' to use as electrodes.
After a 100 mile drive to Buffalo, NY I found my electrodes had rusted to the point the water was murky and no gasses were being produced. I did not replace them and ran the rest of the tank out sight seeing in Niagara Falls. I did get a pleasant surprise when I refilled the tank.
Even though the device was running for only 100 miles of that tank of gas, my overall mileage (including the 2/3 of a tank the electrolysis unit was not functioning -which again, normally meant 15 mpg highway) still indicated I had gotten 23 mpg! Remember, this was with the device only running for 2 hours of driving. The mileage for this trip must have been quite good in order to register 23 mpg overall.
The next test came after I finally got a chance to have the system work by forcing the gas into the top of the Carburetor with a pump. I shared the idea with another friend of mine who put a windshield wiper pump into the top of the electrolysis tank and used it to force the gases into the top of the air filter.
The results are 67 mpg highway, 47 mpg city in an 8 cylinder 350 engine running a 4WD pick up! The other truck it was installed on was a 4WD pick up with a 351 engine. Both trucks report the same mileage.
Admittedly there are other ideas I have for improving the system (see 'improvements Section' below). This publication is being written to inform people of the basic unit with hopes they will try to improve it themselves. This electrolysis unit will help in the saving of our environment, and the saving of our wallets from those who would greedily take advantage of us.
Advantages and Disadvantages
There are a few minor drawbacks with the electrolysis unit. It requires maintenance from time to time. The first drawback is that the electrodes will need replacement periodically.
Normally this will be after every two tanks of gas. Every two tanks is not a bothersome thing when the mileage gain increases the distance/time you go between tanks. A typical vehicle that has a 20 gallon gas tank and gets 15 city mpg will go 300 miles before it needs refuelled.
Using the electrolysis unit, the same type of vehicle may get 47 city mpg (as the two trucks cited previously). If such a vehicle is getting 47 city mpg, it will go a distance of 940 miles before the tank needs to be refilled.
The second drawback is that the unit will also need cleaned out after every two tanks. As the electrodes deteriorate, they deposit a black, wet, powdery sludge at the bottom of the tank. Just rinse it out with water.
The benefits are numerous. Gas mileage increase; more money in your pocket; the engine burns cooler which could have the possible results of a longer engine life; a little more power increase has been noted in our test vehicles; less gasoline being burned implies cleaner emissions; cleaner emissions means a healthier environment.
Lets Build It
There are two sets of diagrams picturing different views of the electrolysis unit included with this publication. The first set is for the basic unit. The second set, almost identical, refers to an advanced unit with a bubbler tube attached. I still have not been able to test if the bubbler tube gives better mileage.
I suspect it will. I have included it in this publication so others may experiment. For more information on the bubbler tube, refer to the 'Improvements Section.' There is detailed explanation of how to build the bubbler tube and the theory behind why I feel it will be an improvement. The rest of the 'Let's Build
It' section will refer only to the diagrams for the basic unit.
The parts list for the basic unit is simple. To make a typical 8.5 inch tall unit, you need the following PVC pipe pieces/parts (I have used schedule 40 pvc - any will do):
A length of 4 inch pipe; a 4 inch end cap; a 4 inch clean out and plug.
You also need 8 X 3/8 inch galvanised carnage bolts; 8 galvanised nuts; 2 wing nuts; 4 washers to go with the carnage bolts; a 2 inch length of threaded hollow rod (the rod used in making lamps through which they run the electric cord is perfect); a small 12 volt windshield wiper fluid pump; a length of wire such used in running extra brake lights; some battery acid (you can get this from an old car battery); circle (and maybe spade) 'crimp' connectors that will allow you to put a circle on the end of your wire so they can easily slip over the ends of the carriage bolts; and a tomato paste can (the inside coating on the can seems to prevent deterioration during the electrolysis).
The cost depends on how many parts you can find laying around. Made from all new parts the cost will vary between $20-$30.00.
Step 1: Where to Mount It
The first thing to do is decide where you will be able to mount this device in your engine compartment. Find a place in your vehicle's engine compartment where you will be able to mount a 10 inch high, 4 inch wide device that will not be in the way of the hood when in the closed position.
Be creative in the way you will mount this device - all car engine compartments are different. The completed unit will need to be inserted vertically into the compartment; stay in the upright position; be firmly mounted so as to eliminate splashing of the liquid inside; be positioned such that the closed hood will not pinch off the air hose coming from the top of the unit; and facilitate easy removal for periodic maintenance.
My father found a good way to mount his. He obtained a six inch diameter 'elbow' connector piece of drain pipe; bolted it (hole upwards) to the side wall; bolted a 1/4 X 2 X 10 metal strip sticking up out of the top of the elbow; inserted his electrolysis tank into the elbow; and then put a hose clamp around the metal strip and the electrolysis tank.
Step 2: Construction
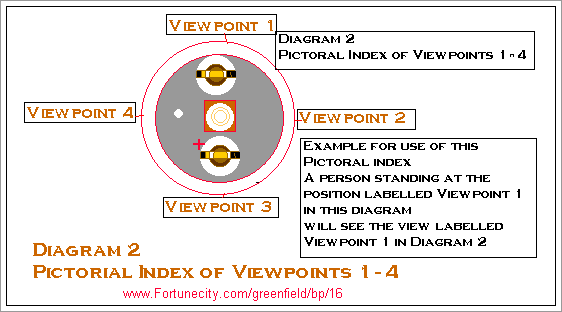
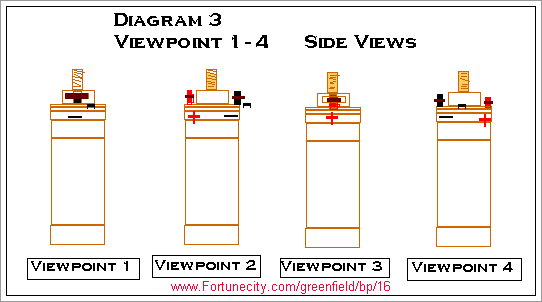
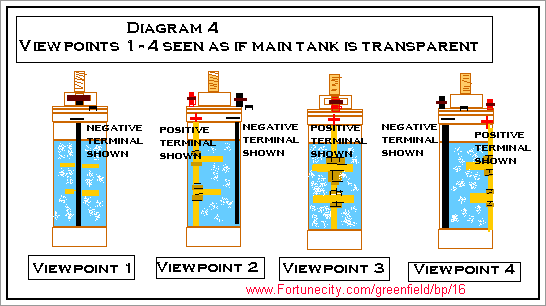
Look over diagrams 2- 4 until you feel you have a good idea of what the completed unit will look like. This will facilitate the following of the building instructions. It is a lot easier than it sounds.
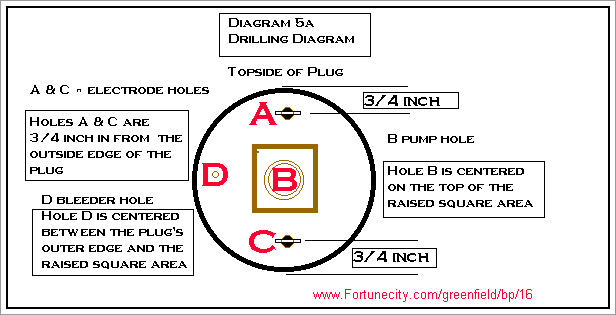
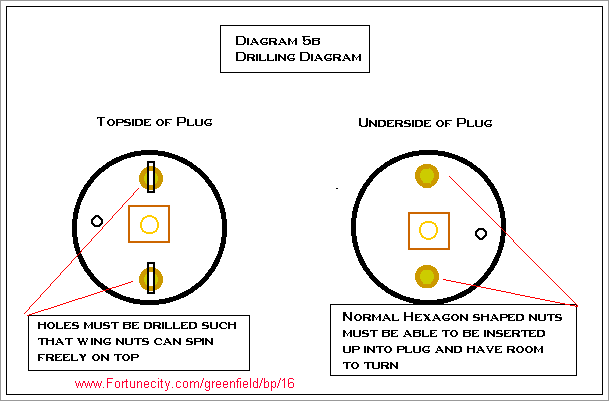
Refer to Diagram 5a and drill holes on either side of the square raised area on the PVC plug that will allow the carriage bolts to be threaded into the holes. But take care that the hole is far enough in so that a nut affixed to the bolt will be able to fit into the underside of the plug without getting caught on its rim. (see Diagram 5b).
Use a red indelible marker to designate one of these holes as the positive terminal. Drill a hole in the top of the raised square on the plug such that the threaded hollow rod can be threaded into it. drill a 1/8 inch 'bleeder hole' (as in diagram 5a) in the top of the cap on the side of the square that has not already been drilled through. This bleeder hole acts as an air intake for the pump to operate with.
To insert your positive electrode, thread a nut down a little more than an inch from the end of one of the carriage bolts. Put a washer down on top of this. Thread this carriage bolts into the hole made for it in the plug. Run it up through such that the nut and washer are tightly against the inside of the plug's cap.
This should leave an inch extending beyond the top of the plug. Put a washer down on the top of the newly exposed end of the bolt and thread a nut down to hold the washer tightly to the lid. Follow this by a wing nut (I had to grind the tips of the wing nuts down a little to allow them to tighten down on the bolt without running into the side of the square raised area of the plug).
The top and bottom of the tin can must now be readied for use. I find the I hydrogen tends to collect better around a sharp edge. Therefore, take the top and bottom of the tomato paste can (I tried using stainless steel discs and found the tomato paste can lids lasted longer because they did not deteriorate as fast) drill holes in them that will allow them to be threaded/slid up the carnage bolts (see Diagram 6 concerning the tin can lids).

Also drill many holes in these lids such that a grid pattern is produced (these holes may also be made by using a nail to punch through the lids), hydrogen bubbles will form around the perimeters of all of these holes. Since these lids give the Hydrogen more edges to collect on, a greater volume of Hydrogen seems to be produced. I tried using more than two plates and found the amount of Hydrogen bubbles did not seem to be increased more.
To make the negative electrode, thread a nut 3/4 of the way down the other carriage bolt's length, slide/thread a tin can lid down onto it, follow the can lid with a nut. Tighten the lid onto the bolt using the two nuts. Slide/thread the other can lid onto the bolt in the same manner such that there will exist a one inch gap between the top nut of the lid farthest down and the bottom nut of the top lid.
Make sure both lids are facing the same direction on the bolt such that the whole assembly will be able to be fit into the electrolysis tank.
Repeat the procedure you used on the positive electrode to insert the negative electrode into the hole that was drilled, and marked, for it in the plug. Screw a 2 inch length of the threaded hollow rod into the top hole. Make it flush with the inside of the plug.
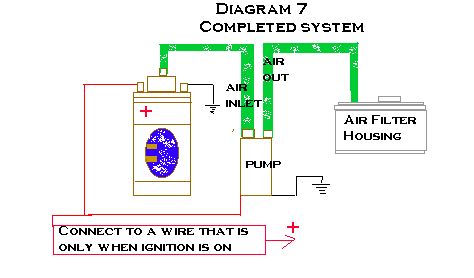
Familiarise yourself with Diagram 7 so as to better understand the following instructions. Mount the windshield wiper pump in the engine compartment. Connect the ground wire of your new pump to the frame.
Find a wire that is live only when the ignition is on (I unplugged the modular plug from my car's wiper pump and tested which wire on this was hot with a probe) and connect the hot wire from the pump to it. Sometimes a car's fuse box has an extra place above the ignition fuse which is tied into the ignition fuse's socket. If so, put a spade crimp connector on the end of your pump's hot wire and insert the connector into the empty socket.
Put a circle crimp connector on the end of a wire, unscrew the electrolysis unit's wing nut from its positive terminal, slide the wire's end down over the terminal, and tighten the wing nut back down. Connect the other end of this wire to the same place you connected the hot wire from the pump.
Apply another circle connector to the end of another wire, put it on the negative terminal (in the same way the wire was connected to the positive terminal), and connect the other end of this wire to the frame of the car.
Fill the tank to within a couple of inches of the top with water (purified water works best, but tap water will do).
Place 3 tablespoons of old battery acid into the water (I personally have never used fresh, but my friend running it on his 4WD truck says he uses a lot less. (see the 'Improvements Section' ).
Hydrogen
Step 3: Watch it work
Insert the tank into its mount in the engine compartment. Fit, but do not screw, the plug into the clean-cut such that you are able to see inside the tank. Make sure the tops of terminals are not touching any part of the car, have a friend turn on the ignition switch.
Watch inside the tank and you should see a bubbling action occurring at the electrodes. The negative electrode should have numerous bubbles forming and coming to the top from all over the surface area of the tin can lids. This is the Hydrogen gas. The positive electrode will have bubbles forming all along its shaft. This is the Oxygen gas.
If the bubble action is not similar to that of an Alka-seltzer, add more acid (in small (amounts) until it is. A normal car's electric system will have only about 12-14 amps of electricity going through it.
Therefore, assuming you have not stepped up the amperage in your cars system, you should never need much more than 3 tablespoons total of acid. If you are using old battery acid and find you need to add a lot, it is probably because someone watered down the acid while it was in the battery.
Be warned! Never use half acid and half water! This has caused one unit to explode! You may be tempted to think that if a little acid produces a little Hydrogen, a lot of acid will produce a lot and therefore the car will be able to run on just Hydrogen and Oxygen. Again, be warned! This does not work. The principle of the electrolysis unit is to break apart water molecules by causing them to migrate to oppositely charged electrodes.
If you increase the amount of acid in the water, you end up allowing a good amount of current to flow from one electrode to another. This results in an internal heating of the unit; expansion of the contents; and possible explosion of the unit.
My fiend was able to put 50 amps of power through his electrolysis unit instead of the 12-14 amps produced by a normal car battery. He uses purified water and new acid. He found the 50 amps allowed him to produce the same amount of Hydrogen and Oxygen gases while using less acid. He only used 2 drops of new acid per litre of purified water!
Step 4: Finishing Assembly
Turn off the car and disconnect the wires from the top of the electrolysis tank. Apply a little petroleum jelly to the threads of the plug (it makes it easier to remove later) and insert the plug into the clean-cut. Reconnect the wires. The unit is ready to work for you!
Improvements Section
There are some improvements to the design that I would like to mention here. Some of these are experimental and will be labelled as such. They have not been tested. Others have been tested and work. The first tested improvement is simple. Using new battery acid from the store, instead of acid from an old battery, will mean you need not use as much acid in the electrolysis unit's tank. The next tested improvement is just as simple. Using purified water instead of tap water increases the I Hydrogen and Oxygen gas production reaction as there are less impurities in the water to get in the way of the electrolysis process. The third tested improvement concerns the electrodes. Since this unit uses electrolysis, the electrodes 'dissolve' as time goes on. The unit described above works well with the galvanised bolts, but after each 2 tanks of gas (average) the electrodes need replaced (though at an average cost of .69 each, this is not too bad). It has been proven that threaded lead rod will last longer than the galvanised bolts do. Not everyone, however, has access to threaded lead rods. You can make lead electrodes easy enough. Lead melts with a propane torch. Obtain a length of pipe and cut it down its middle through the whole length. Clamp it tightly together with hose clamps along its length. Pour molten lead into the pipe. After cooling, extract the lead rod and thread the end using a tap and die set. A simpler method may be to improvise using a plaster mould of a wooden dowel.
The next improvement is using what I call a 'bubbler'. The bubbler can be made using a length of aquarium air pump hose; an air-stone for the same; and a valve.
The concept is to sink the air-stone (with hose attached) into the liquid such that the stone is on the bottom. Drill a hole though the plug and insert the valve through the hole threaded preferably). Attach the air hose to the bottom of the valve.
Plug the breather hole in the top of the PVC plug by screwing a screw into it. Obtain a larger pump that will be able to move more volume than the windshield wiper pump can.
It must be strong enough so that when it is attached to the tank, its suction will cause air to be drawn in through the open valve and be bubbled up through the water in the tank. I believe this will guarantee that the gases going into the engine will be of a more concentrated nature than the previous design.
In the previous design, I feel some of the outside air being sucked through the open bleeder hole gets pulled into the engine without becoming Hydrogen-enriched.
I feel that the more Hydrogen that enters the system, the better the mileage will be.
Another type of bubbler I have assembled is a little sturdier. Obtain a length of 3/8 inch PVC pipe, 2 elbows, one end cap, 2 in-line connectors, and I valve.
Drill a hole in the top of the plug that will allow a piece of 1 inch pipe to pass through while also leaving room that an in-line connector can be placed on the underside of the plug without interfering with its insertion into the clean-cut.
USE NO CEMENT YET! THIS IS A TRIAL FITTING
.Cut a length of pipe such that when inserted in this hole, an in-line connector can be put on each end and be able to fit snugly together.
Pass the pipe through the hole and put the in-line connectors on it. Insert a small section of pipe into the top connector, put the elbow on top of this. Insert another short piece into the elbow's free end and attach the valve to this.
Put the tank in its mount under the hood and pivot the valve/elbow/pipe sticking out of the top such that the valve system does not interfere with the closing of the hood/wiring/etc. Glue the pieces together.
Attach another section of pipe such that it will extend down into the tank and, when an elbow is placed on it, be just off the bottom of the tank. Insert this into the connector just under the inside of the plug.
Cut another small length such that it can be inserted into the open end of the elbow; be capped; be pointed towards the middle of the tank; and fit into the bottom of the tank without running into the opposite side wall.
Drill many 1/16 inch holes in a grid pattern all around the perimeter of this piece of pipe. Insert it into the elbow and cap it.
Test, by assembling the entire tank unit, that this bubbler tube system does not interfere with the tank's assembly. Take the components of the bubbler tube system apart and glue them back together.
One other experimental improvement may be using the bubble tube attached to the vacuum from the engine, utilising the line from the PVC hose as mentioned in the previous reading, while simultaneously having the windshield wiper pump also attached.
This would make the Hydrogen and Oxygen gases enter the engine from before and after the carburetor (or fuel injector) unit. It may increase mileage simply because more volume of the gases are being presented to the engine. I have not yet tested this.
Additional HIMAC In formation
The inventor of the Hydro-boost has tried to keep cost down for sake of practicality.
Following are some further things I thought you should know to prevent additional costs of breakdown.
First, install an in-line fuel filter on the output of the Hydro-boost unit. This is just to prevent any unwanted materials from entering the engine.
You can get a clear one and mount it so that if any of the electrolyte from the unit comes out, it will catch in the filter and you can see it accumulating, drain it back, and lower your fluid levels to prevent this pull over from happening again.
Second, install your tee connector as close to the PVC valve as possible. This allows for better mixing and greater time factor for the hydrogen to react with the Hydrocarbons in the PVC line. The end result is the reforming of the fuel into natural gas which produces a greater explosive force.
I also believe that a mixing catalyst jar like the 'Condensator' or' Turbonator' would further aid in this reforming of the fuel. Just put the catalyst jar after the T-connector where the oil (coming from the PCV) and hydrogen (coming from the Hydro-boost) mix and put the jar's output to the regular PVC intake at the base of the carburetor.
I was mentioning this to Grant Goldade of the MPG high mileage club and I said someone should be able to build a device like that for about 12-14 dollars. lie said 12 dollars he saw it on the web and we have a reprint for your use later on in this Manuel courtesy of John Draper and the KEELEY.NET I have also added my understandings and some of the Condensators testimonials from back in 1982. If you do not want to build one Condesators were still being sold out there. The patent is expired and you would not be breaking any laws or patent right anyway if you are just building and installing for ones self.
When you have a new, more explosive fuel, you should make a change to your ignition timing so it fires later. Normally a car's timing is adjusted so the spark tires just before the piston reaches top dead centre (TDC) in the cylinder. This allows the fuel time to ignite.
When gasoline is ignited, it starts burning slowly. Then after the piston gets to the point were the power stroke starts, the main burn from the explosion begins and continues through the burn as the piston goes down. The fuel continues to burn in the exhaust system.
With the hydro-boost, the hydrogen-laden fuel reforms into a lower boiling hydrocarbon with a greater explosive speed and force. If the timing is the same as in a normal gasoline engine, the new fuel's explosive forces will fire before TDC and will not be properly harnessed. This will not aid mileage, but actually could retard it as well as cause possible engine damage.
The damage might be caused because the explosive force is pushing down when the piston cannot really move much (when at the TDC point). By retarding the timing, the forces can fire when the piston is ready to go down. You can set the timing for 3-5 degrees later. A tip for setting your timing: I have found (if you have no timing light) you can use a vacuum gauge. Just set the engine to the highest vacuum at idle.
Third, I tried the air compressor system, using the car's existing air conditioning pump. The pump seized up 15 miles out. This cost me a compressor. I am not sure if it was my fault for feeding direct voltage to the drive pulley coil or if it seized because it was not pumping Freon (what it was intended to pump).
The inventor said his friend installed no special wiring, he just turned the air conditioner switch on. In the end, the air conditioner system cost me a compressor, belt, breakdown tow, and aggravation.
I have since learned there are two types of compressors One will work one will not. Instead I used a 12 volt inflater blower, the type for beach toys. It was effective in moving the gases but did not create a great vacuum which seems to help to give the extraordinary mileage.
As far as mileage feed back from my friends experimenting with the Hydro-boost, I have been told of values around 20%-40%. I believe the difference is in the fuel used. I understand they put different additives in the fuel (called anti pyrolysis agents, tetra ethyl lead, MTT, and assorted agents) to prevent decomposition and pre-combustion. These additives basically prevent the chemical reaction of the gasoline with the hydrogen so it does not reform into natural gas.
The guys in Pennsylvania that were getting fantastic gains may be are getting their fuel and oil from a local independent refiner that do not always put these additives in their fuel. I have also heard that the high test fuels have less additives I have been told of one particular brand is used for the auto manufacturer executive cars that run supercarbs .
These are called 'experimental', but I think they have their experimenting done and are not letting these cars out to the general public because they are too good. High mileage means little pollution and no carbon to foul up an engine or spark plug. 1,000,000 miles on an engine is not good business sense to them.
If you do not believe such cars or carburetors exist, just ask around. There have been many of these cars that have slipped through to dealers and some 'general public' customers got them for awhile. But, these cars must use clean fuel or they do not work long as high mileage vehicles for very long.
Fourth, instead of using battery acid you can use baking soda or Hydrogen peroxide to make an electrolyte for your Hydrogen supply. Battery acid is not always readily available. Some may worry about acidic transfer to the engine, so it may be better to run both baking soda and acid alternately. The baking soda is a base that will neutralize the acid if any is transferred.
Fifth, you can just make a simple sight gauge as I did to check fluid levels. Just use two 1/4 inch N.P.T. elbow to 3/8 tube. Fit one on top, one on bottom, and use clear vinyl tubing in between. Position this gauge so you can just pop the hood and look at the tube to determine your fluid level.
You may even want to use a T-connector at the top of this gauge (instead of an elbow), put a removable cap on it, and use this as a way to replenish the fluid levels.
Sixth, to know that the unit is working (and to what extent), you should install an amp meter (just the standard style) in line with your electrode. This will enable you to add to the acid content until you get the 10- 12 amps.
If you check it out occasionally, you will see when your amperage is down. When it's down to 4-5 amps, you know to check water level; acid content; or condition of your rods and plates (for cleaning or replacing as set out in first section of the text).
Seventh, I have not tried other metals for the rods but tried galvanised metal electric box covers for the plates because my tomato can lids disintegrated. I used the octagon type covers and cut them in half Just trim the end to fit the container. I did drill the holes as described in the instructions. Because the water/acid does appear to 'boil' (produce gas) at the edges of the holes.
You could get half inch rod in a variety of metals and just cut a half inch thread on the ends to mount or hold plates. Also, you could get a one inch compression fitting, drill it out for the rod to go through, and just use stainless steel gear clamps to attach the wire and plates. Cut the letter H on your plates where you want your rod to go through, bend the tabs the same way, push your rod through, and clamp with a gear clamp over the tabs to hold the rod in place to give an electrical circuit.
Eighth, I recommend fusing the circuit. Use a 25 amp fuse. I have seen the metal deposits form spikes in the plates and it could be possible to short out. Fusing a Circuit is always a good idea in whatever you are doing. Safety first.
Ninth, I would recommend using a good oil additive that bonds to the metal for extra protection. I recommend MT-10 for oil and FT 10 in your fuel for upper cylinder lubrication.
You will want a little extra lube in your engine because you are getting a little more water in your combustion with this system. MT- 10 and FT- 10 can be ordered through
Muscle Products Corp.
112 Fennell Drive, Butler Pennsylvania 16001
1800 227-7049 Or(412) 283 0567 fax 412 283 8310
Or in Canada call 905 680-2724 or on the internet at handsense Please tell them you heard it from HIMAC.
Tenth, multiple electrodes plates may help.
Instead of 2 electrodes, use 4 or 5 and insulate between them a the 12 volts is probably better spaced out 2-3 volts per area between the plates. As for as orgone goes 1 would like to see it get enough to constantly triple mileage.
We will be investigating and informing any on the HIMAC mailing list.
I would like to stress this system is experimental, and I alone could not do all this research required to make sure that we are not actually putting a different pollutant into our environment.
You sometimes can cut down a pollutant that is a minimum toxic and generate a small amount of something that is very toxic. I do not think this is the case with this new system, but I hope to do further detailed analysis and will pass on any further information 1 find.
I also ask that if any of you learn anything about this system that could help others please submit it to HIMAC PUBLISHING if it is helpful we will reward as fitting (as well as being rewarded by knowing you have helped to share so we may all benefit).
The article from "Nexus" sound unbelievable and could be more misinformation to take people of the real track of high mileage systems. But I do not think so, possibly, they could be just another misunderstood idea. I am thinking that if Hydrogen is so reactive with hydrocarbons, then it could be possible these systems (which appear to use no fuel) would actually work by using the PVC blow-by for a feedstock which chemically reacts with the Hydrogen to produce natural gas. This theory would make sense chemically and would not break any known physical laws since energy cannot be created or destroyed, just transformed (Law of Conservation of Mass and Energy).
The small amount of oil from the PCV along with the hydrogen would give enough natural gas to run the engine. If this chemical process is the case, it would appear that the car runs on just water (and no big deal if you went through a quart of oil every few hundred miles or so).
I have not tried the Nexus system yet and feel I must pursue the system that I understand as Thermal Catalatic Cracking (T.C.C.) and try to work them both together. I just will have to see what time and finances bring. I hope this manual will help many to save fuel; our environment; and to help you understand that mileage increases are possible, but not acceptable with corporations just trying to get your money.
For other information on high mileage technology be sure to read my book "Secret Super High Mileage Report" That we sell money back if not convinced for $19.95 at the time of printing there are 940 sold with only I refunded, Plus many in the hands of politicians and environmentalists and media or other books now available through the HIMAC Publishing.
Following is a list of these publications: 3 Books By Allan Wallace: "Secrets of the 200 MPG Carburetor" "Super Mileage Carburetors and How to Build Them" "200 MPG Carburetors Fact or Fraud" these were the ones that got me started in this information. In the spring of 98 1 talked to Allan Wallace explained him the principles of Thermal Catalytic Cracking. He has read my book and stated that it explained the idea so completely, He now understood thermal catalytic cracking (TCC) was the answer, not just vaporizing.
I also have available "Gasoline Crisis Answers", By A. Jackson, "The Secrets of the 100 MPG Automobile" By Thomas O'Brien: and "The Elusive High Mileage Carburetor"
By Larry Wagner: All of these books are $10.00 US or $15 Canadian
The Ultimate fuel economy book by Micheal Hollar is available as well as Don Novaks 100 miles per gallon seminar book at $25.00 each.
This information has challenged me to commit my life to spreading this type of information to the general public.
As a Christian, I think I need to submit to the betterment of all. I have tried this part-time, but now a full-time effort is necessary. I hope others will help, full-time or part-time, but I know I must take the lead and lay out the challenge to just get people learning the truth.
Help me help us all.
Suppressing good ideas because somebody else is making money has cost mankind more than we could possibly imagine. Together we can get the information out and all will win! If you (or anyone you know) have a great energy efficiency idea that is fighting the system, contact (or tell them to contact) HIMAC Publishing. We can win if we share. They can not suppress it when everybody knows.
Conclusion
By Lee Brewer and 100% agreed with by J. Bruce McBurney
I hope this publication has led you to some interesting discoveries. Not only about high mileage, but about how even what all others call impossible, can sometimes be achieved if we just will apply ourselves. Being a Christian, I give God the glory for allowing me to be able to develop this system. I acknowledge His wisdom and guidance in leading me to this solution. The reason why I believe I was able to achieve this is because the way He has changed my life. Please take the time to read the following.
The only other thing I would desire for you to understand from this publication is that God can save you more than money, gasoline, and the environment. He has the power to save your soul (ensure you will be in Heaven). Christ, being perfect, died so He could pay the penalty (because we sin) of eternal torment that you and I would have to suffer forever in Hell.
Think on this, let it sink in, and then simply by acknowledging to Him that you know and believe he died for you will ensure you spend eternity with Him. It is that simple. John 3:16 (King James Version of the Bible).
HIMAC In formation on PVC jar
This is to supplement the PVC device to help understand how and what it does. My research indicates the oils actually are being Thermal Catalytic Cracked TCC The BB's copper coating is a catalyst I am just stating this so you may understand that there are other materials that can accelerate the breakdown and it may be a good idea to layer in other materials. Each different material will help to break down different molecules and so the more you break down the more mileage and pollution improvement is noticed.
One in particular is silica gel, that little package that comes in medicines and electronic equipment is used to act as a drying agent. Apparently it drys by disassociating the molecules breaking them into hydrogen and oxygen I always though it absorbed it. It is also used a great deal in the oil refining business as a catalyst. It is also what was in the
little screen bag that was in the Condensator one of the devices that inspired the PVC jar. I think this is what John meant when he said glass beads. There are other metals that are used Nickel is used in refining also, so you could just take ten five cent pieces and put them between two screens in you V8 juice can. For silver you could use dimes. If you want gold and platinum are excellent catalysts if you had an old chain even just a plated one put it in between a layer of screens.
It will up the cost but may help you save more money and think of it this way, it is safe place, a catalyst is not used up. It just will need a good cleaning and the burglar wont find it under your hood. Also the beads from a catalytic converter if they were cleaned well in a acid bath or roll them in fine sand paper for cleaning any catalyst poisoning agent of the coating on the ceramic beads.
This you must understand that there are many different oils and fuels out there. They are all the same basic hydrocarbon but if a different configuration and also different additives to prevent the breakdown of the molecule. What we are doing is breaking the molecule down into a lighter more dynamic, having more explosive force fuel that bums clean so their additives defeat this purpose. You might find that the cheaper oils will work better and synthetics see little gain.
I still recommend using a good oil additive that is a metal treatment like Duralube or Mt-10 oil additive and fuel treatment these are not anti catalyst agents or molecular boners or anti pyrolysis agents that the oil companies use to stop super carburetors.
If you are not getting great gains possibly change oil and fuel brands the smaller independent refiners might be best, when you try different brands try the higher grades as well. The way an engine works, some of the fuel condenses and goes down the cylinder walls into the oil pan. This will thin you oil and will be the lighter vapor that will fume off into your jar first. It will get cracked into fuel that will take you down the road not just heat it up or foul up your engine.
In assembling your unit you could use a regular jar size by eliminating the gear clamp and using mechanics wire or copper wire to hold the screen. Secure it together with your clamp and wrapped the wire tightly on each side of gear clamp and then remove gear clamp if it is loose you could just put a dab of epoxy glue in three spot around it to secure it. Not too good you might want to take it apart for cleaning or try other catalysts.
John states to use hose in a coffee can to secure it, It would help that you ran hot water line going to your heater to heat the jar and contents Thermal Catalatic cracking is an endothermic reaction meaning it absorbs heat and will operate better heated. This will also keep the water vapour flowing thru the jar and only the oil sludge condensing in the bottom the water as steam helps combustion power because it expands and creates more pressure than air when heated by the combustion. That is why you get better mileage on a rainy day.
Remember to keep track of fuel used and brands and mileage increase obtained. You will find the right combination for your engine and location. Please be sure to check our web site occasionally and see what we learn more we can help you find the better brands to get the best results. Please share what you learn and we will continue to do the same to help us all and our world with cleaner air for our children.
email supplier of this article for any additional information
