

you will need:
three small jars, about 150ml
six pieces of stainless steel about 45 x 90mm that will fit inside the jars.
You can use old stainless steel knives from op-shops
one teaspoon of baking soda (sodium
bicarbonate)
plastic orange bag mesh
a small DC power supply about six to
nine volts
some hook-up wire or other thin insulated wire
waterproof glue
a LED (light emitting diode), any colour. Most electronic equipment has
these. Alternatively, use a small electronic buzzer
a multimeter if you have one
tinsnips, pliers and some rubber bands.
The principle of the fuel cell has been known for a long time, but it is now used in spacecraft, power plants, submarines, even to power video cameras.
They work by allowing two high energy substances, like the gases Hydrogen and Oxygen, to combine to form a lower energy substance such as water.
In the process, heat and electricity are formed.
To combine properly some form of catalyst is needed. Platinum is a good catalyst, but it is rare and very expensive. Nickel and cobalt also work, and nickel is a component of stainless steel.

Our fuel cell will work by breaking up some water into hydrogen and oxygen using our DC power supply We will then remove the power source, and the hydrogen and oxygen should recombine and produce a small amount of electricity.
While our fuel cells will not be very efficient, they will show the principles behind the larger commercially made units.
Start by cutting the stainless steel to hook up wire to one. This can be done by soldering with a silver based solder, or just by bending over a small part of the stainless steel, trapping the bared end of the wire in the fold.
Bare the other end of the wire and attach it to the next piece of stainless steel. When you have finished, you should have two strings of three plates, with one end plate in each string having a 200mm or so piece of wire attached for hooking up to the power supply
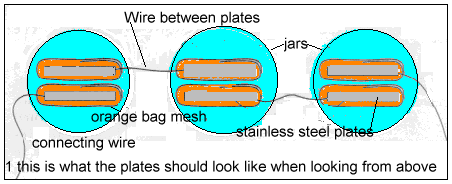
Each plate should now be wrapped in a small piece of the plastic mesh, which is secured with a rubber band. This acts as a separator to prevent the plates shorting together, as well as to help hold the bubbles of gas on the plates.
You can use the waterproof glue to insulate the plates where the wires are connected. You can see what it looks like in Figure 1.
Each pair of plates is placed inside a jar. The jars are then filled with water into which has been dissolved a teaspoon of sodium bicarbonate. This allows the water to conduct electricity.
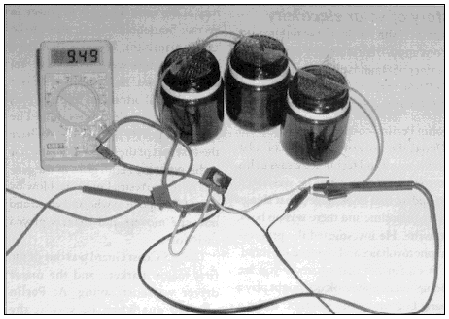
Now connect the power supply to the cells, one wire to each end of the string of cells. After a while you should see tiny bubbles appearing on the surface of the plates. Now disconnect the power supply and quickly connect the wires to the LED or buzzer to see what happens. The LED should light briefly or the buzzer should buzz. If not, you may have them connected the wrong way around. Swap the wires to see what happens.
This article originally appeared in The April June 2000 issue of the