Construction of solar box cooker
Advice on how to build one
Materials needed
5 large pieces of cardboard (see#2 TIPS AND STRATEGIES);at least two should be 4 and one half feet across;Flatten cartons from bicycles,appliances or furniture are excellent (see step 1A,alternated reflector regarding cardboard)
50 feet regular aluminium foil 12 inches wide.
1pint white glue.
window glass 20'' by 24"
* 8 feet wood molding:window screen moulding is best(see section on alternate Reflector)
one tube clear silicone caulk
4 feet slash cord or similar heavy string
Insulation 2 inch stack of newspapers
Black metal tray approx 17 inches by 21 inches (see step 4 cooker completion)
Masking tape.
Tools needed:
Box cutter or sharp knife
Pan or bowl to mix glue.
brush or small roller to spread glue.
Straight edge (eg yardstick) plus blunt tools pliers handle or large screwdriver ) for scoring cardboard.
Saw
3/16" drill
Caulk gun
Tools for holding cardboard while glue dries( eg clamps,clothes pin bricks masking tape etc.)
Scissors
Tips and Strategies
1 Cut all patterns with scissors on solid lines;dotted lines show where cardboard will be folded. Place patterns and hold in place using masking tape.
2 regular cardboard is easier to work with than double strength cardboard and is satisfactory for most parts of the box.Double strength cardboard is useful for the reflector and lid and may avoid need for reinforcement.
3 Use full strength glue for fastening cardboard pieces together;dilute half glue;and water) for glueing foil to cardboard.
4 Score cardboard (using straight edge and blunt instrument )prior to folding .Score on the side toward which the fold is to be made in order to avoid tearing the cardboard.All folds are UP,towards the side on which pattern was placed .Except narrows flaps on the inner box ,which are scored on the reverse side and folded in opposite direction.
5 Place pattern on cardboard to take advantage of folds pre-existing on cardboard,otherwise place patterns on cardboard so that the new folds are as far way from pre-existing folds as possible.
6 When working on the floor don't kneel on the cardboard you are going to use;it makes dents.kneel on a scrap of cardboard it protects the knees.
7 Start with the lid;there are several step; requiring glue to dry in between ,go to another part of the box while it is drying.
8 A second piece of glass is useful in marginal weather (where there is wind or intermittent clouds,place on top of lid to avoid heat loss.
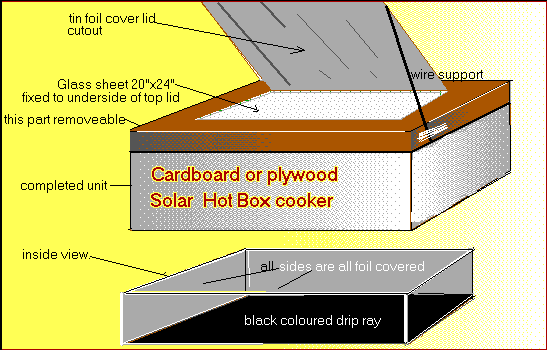
Step 1 Construction of the lid
After cutting and scoring cardboard fold tabs at corners outside the side flaps and glue,securing with clamps and or tape.
Allow time for glue to dry before proceeding.
Invert top and adhere glass to underside of top using silicone caulk.Make a bead of caulk about 1/2 inch in from the edge.Press flat with something heavy until dry.Fill in the space between the glass and sides of top with strips of cardboard about 2 inches wide (measure to fit exactly) and glue in place.
After caulk is dry on underside ,invert top and put a bead of caulk around glass window where it is framed by the cardboard.
Step 1A Construction of the Reflector.
Pattern is design to provide a reflector from the same piece of cardboard from which the lid is made.
Simply cut along the three dotted lines in the center of the pattern and score on the reverse s(top of lid) of the fourth side providing a large flap which will serve as the reflector.
An ALTERNATE REFLECTOR(which provides a larger reflecting surface and protects the window better when cooker is not in use) can be made by cutting a separate piece of cardboard (double strength cardboard is useful here) to fit the full size of the lid.In this case the larger flap provided by following the pattern will be cut off along the fourth side and removed.This is a piece can be later used to improvise a drip pan(see section on cooker completion)
Which ever reflector is used .completely foil the side facing towards the glass .If the alternate reflector ,score three inches from the edge of the back side and glue to lid.
If regular strength cardboard has been used ,it is suggested that the reinforcement sticks be glued to the three unsupported edges of the reflector.
Prop mechanisms for the reflector.
[A] Punch holes through side of the lid and reflector.Tie stick in each location so that in each location so that it can be slid up and down to adjust the reflector.
or
[B] Glue blocks of wood about 3/8" thick 6 inches to 8 inches long,with holes drilled in side to lid and reflector .Use heavy wire( such as from coat hanger) for support
Construct an inner box to fit inside larger box on all side of this inner box glue the al foil to each inner side.
ADD black metal pan to bottom of inner .It is essential to have a black drip pan in the bottom of the cooking chamber.
If a metal pan is not available it is satisfactory to improvise a pan by covering one side do a piece of cardboard with foil cutout and then painting the foil black
GETTING BOX READY TO COOK
After the box is complete ,but before cooking allow box to dry several hours in hot sun so that no chemical odours from glue or caulk are absorbed by food.
Make sure there is a black drip pan in the bottom of the box and that any cooking pots have black or dark lids.
Finishing touches.
Line the underside of the lid with foil in order to cover all spaces between glass and cardboard.
Cover all corners with two inch paper tape such as sheet rock tape or brown paper bags cut into two inch strips using
full strength glue.
This helps protect the corners.Don't use pre adhesive tape, such as masking tape or duct tape ,as it fails to hold up against
repeated exposure to sunlight.
Make short feet for your cooker of 2 inch squares of wood ,plywood or several layers of cardboard to protect the bottom of cooker.
Cover cooker with wallpaper ,cloth,contact paper or exterior paint. two coats of exterior paint are especially helpful in making your cooker more waterproof.
The information provided came from an individual know to me as IM
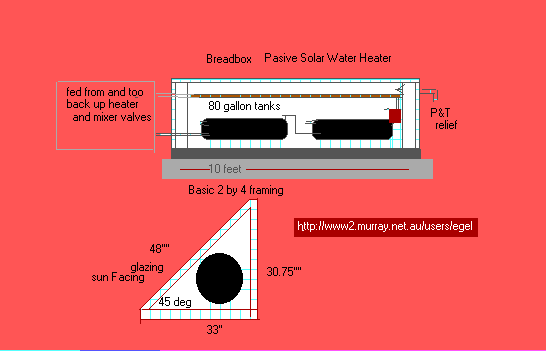
A solar water heating system based on the hot has been also constructed to provide hot water.
a simple diagram is presented below.
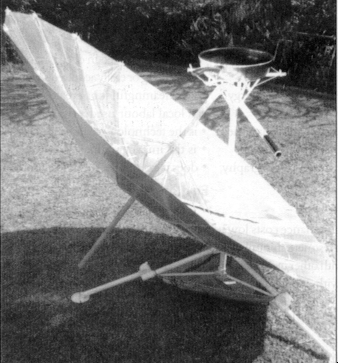
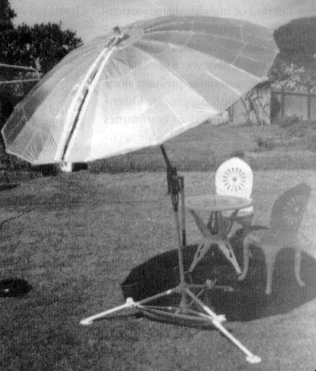
Solar Bar be Que
Here is an interesting design using an umbrella frame and wine cask badders although I think al foil monted on cardboard cutouts to match the umbrella shape and mounted in place