
The absorber plate is the heart of the collector panel; it is worth paying special attention to it. Let us assume that we want to make a 0.75 sq meter absorber plate, say about 1.2 m x 0.625 m in dimensions. Three methods, all of which are within the capability of a good handyman, will be described.
You should obtain a copper sheet, corrugated, square-corrugated or ribbed, such as the shapes shown in Fig. 4.20. You may try to use galvanised iron, but it is more difficult to work. 0.5 mm thickness is quite adequate. Cut this to the required size, so that you have a flat part along both long edges. With a corrugated sheet the edges may have to be flattened; vath ribbed sheets you may have to adjust the width of the absorber to suit the rib spacing.
Take a flat copper sheet, slightly larger than the above, as shown in Fig. 4.21. Using a 20 mm diameter timber dowel rod as support, bend up both ends of the flat sheet and fold over, to form the headers.
Hammer the sheet down where it overlaps the corrugations or ribs, to get a good fit. This folded-over edge can be fixed through the two sheets in each valley of the corrugations, with either rivets or small bolts and nuts (Fig. 4.22).
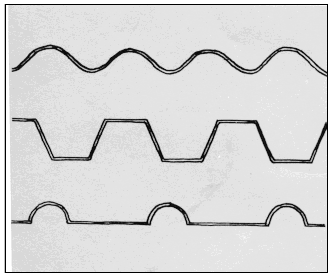
Fig. 4.20 RIBBED OR CORRUGATED PROFILES
Sections similar to these would be suitable for the lower sheet of an absorber plate.
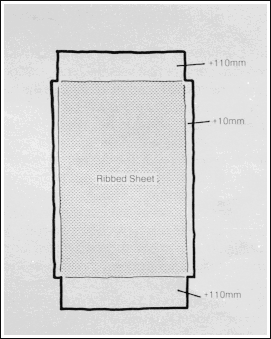
Fig. 4.21 PATTERN FOR THE FLAT SHEET
This will be the upper sheet of the absorber plate. The edges are to be folded over.
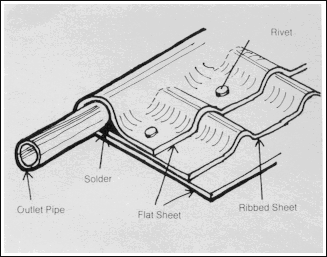
Fig. 4.22 FORMING THE HEADER
Lay the flat sheet down with the ribbed sheet on top, fold the ends over a dowel rod and dress it down between the ribs.
The long ends are also folded up and will be bent over the edge of the profiled sheet, forming a flat seam. A short piece of 20 mm copper tube will be inserted into the headers at diagonally-opposite corners (in place of the dowel rod), shaping the sheets to fit the tube, and brazed or soldered in. The ends of the headers at the other two corners must be blocked off.
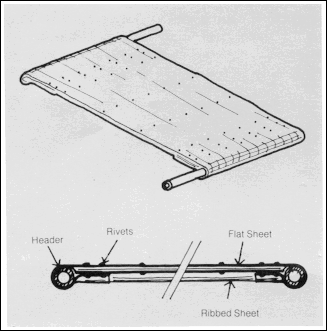
Fig. 4.23 THE FINISHED SHEET ABSORBER
Flat seams along the long edges and rivets in the valleys at about 150 mm centres.
Small holes are drilled along the valleys of the corrugations at about 150 mm centres and the two sheets are rivetted together. All rivets, the flat seams and the folded-over sheets are to be soldered or brazed. Fig. 4.23 shows the final product.
Serpentine absorber
Take a metal sheet of the required size (in our example 1.2 m x 0.625 m), 0.7 mm thick in copper, 1 mm thick if aluminium, or 1.5 mm thick if galvanised iron. Obtain 1 0 mm diameter annealed (soft) copper tubing. This comes in coils wound on a sheave, like a cable, in various lengths.
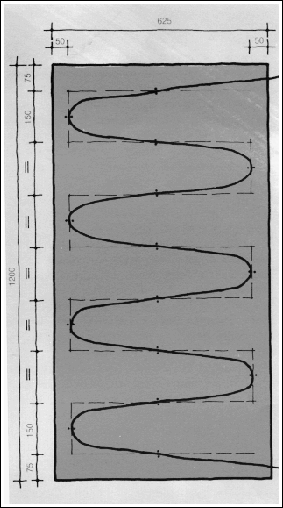
Fig. 4.24 MARKING OUT THE SERPENTINE
The continuous slope of the tube is important if you want to use it in a thermosiphon system.
In our example you will need a length a little less than 5 metres.
Mark out a pattern on the sheet, as shown in dotted line in Fig. 4.24. Before doing this, you have to decide where you want the inlet and outlet - on the same side, or on diagonally opposite corners. This will depend on how you want to connect your panels. Figure 4.25 shows some alternatives. In the example shown, the connections are on the same side, therefore the spacing is determined along the centre-line as follows: * divide the 1 200 mm length by eight; you get 150 (if you wanted connections at opposite corners, you would divide by nine); * measure up half of this (i.e. 75 mm) along the centre-line from both ends, and divide up the distance between these two markings into seven spaces of 150 mm each.
The spacing of these grid lines should be between 120 and 150 mm. Drill pairs of small holes, 1 0 mm from each other, symmetrical about the line markings, as indicated in Fig. 4.24.
Now, uncoil the copper tube and straighten some 2 m at a time (it is best to work on the floor, unless you have a large flat work bench). Bend the tube to the serpentine shape, as shown in Fig. 4.24. Try to obtain or borrow a hand-bender tool.
If you can't get one, you can bend the tube around a cylindrical object of about 100 mm diameter, such as a bottle. Do the bending slowly and steadily, to avoid crushing or flattening of the tube. Once you have flattened it, it is very difficult to get it back to shape.
When the serpentine is ready, lay it on the flat sheet and fasten it by short lengths of copper wire fed through the holes and twisted over.
First along the centrel ine, then at the bends. If you don't trust your accuracy of bending, you can pre-drill only the holes along the centrel ine and drill the holes at the bends where required by the ready serpentine. The serpentine should have a continuous slope, or else you won't be able to use it as a thermosiphon connector and it won't drain itself.
When the fixing is done, a good thermal bond is to be created between the sheet and the tube. If a copper sheet is used, you can run a fillet of solder along both sides of the tube (Fig. 4.26). If dissimilar metals are to be connected (i.e if you are using an aluminium or steel sheet), the only reasonable way of making this bond is by using a thermal paste. This is a putty-like substance: metal particles with a plastic bonding agent. It has a reasonable thermal conduction, but not as good as the metal itself. If should be used to form a larger fillet, as shown on the right-hand side of Fig. 4.26.

Fig. 4.25 CONNECTION OF PANELS
Note the differences in inlet and outlet positions in each absorber panel.
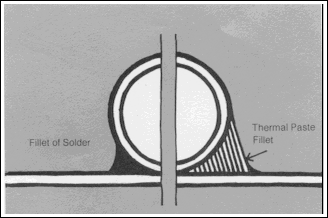
Fig. 4.26 TUBE-AND-PLATE CONNECTION
Solder or brazing can be used between copper tube and copper plate. Thermal paste should be used between copper tube and aluminium plate.
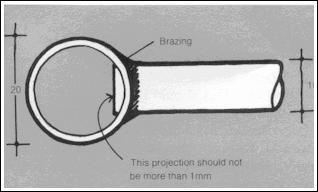
Fig. 4.27 FITTING TUBES TO HEADER
The tube is inserted into the hole drifted in the side of the header and brazed around. The tube should not project into the header as this would obstruct the flow.
To build a 1.2 m x 0.625 m absorber, you need the
following materials:
* 2 lengths of 20 mm diameter copper tube, 0.70 m long
* 5 lengths of 1 0 mm diameter copper tube, 1.1 7 m long (in this case you are better off with hard drawn copper)
� a copper sheet, 0.25 mm thick, 0.625 m )k 1. 1 6
M.
This will give you 125 mm tube spacing. (Alternatively you may use 4 lengths of 1 0 mm tubes, to get a spacing of 160 mm, but then the sheet should be 0.7 mm thick. Refer to section 2.4 for sheet thickness and tube spacing combinations for other materials.)
Mark out and drill 5 holes of 1 0 mm diameter in the two header tubes, to give a close fit for the small tubes. These small tubes are then inserted (Fig. 4.27) and brazed to the headers to give a tube-grid, as shown in Fig. 4.28.
The next step is to fit the sheet to the tubes. This can be done the same way as with the serpentine absorber:
* if copper sheet is used, a continuous fillet of solder along both sides of each tube;
* if dissimilar materials are used (e.g. an aluminium sheet) a few wire ties through drilled holes, then a thermal paste fillet.
It is better, however, to form semi-circular ribs in the copper sheet to match the tubes (Fig. 4.29). A 0.25 mm thick copper sheet is fairly workable, so this should not be too difficult. You can form an 11 mm wide semicircular groove in a 1.2 m long solid piece of timber(by planning or milling).
Place the copper sheet over it.Lay a 10mm dowel over the sheet and hanmer it down in theb groove,thus creating the rib (Fig 4.30) In this cas of course the 625 mm width of the sheet would be increased in the first place,as the ribs will take up some extra material.Allow about 6mm extra width for each rib.
Which ever of the three methods you are using when ready,the absorber surface should receive a black painted finish. It is better to keep the smoioth side of the absorber upwards ( to receive the black
paint), as the larger ribbed or piped surface would increase your heat loss.
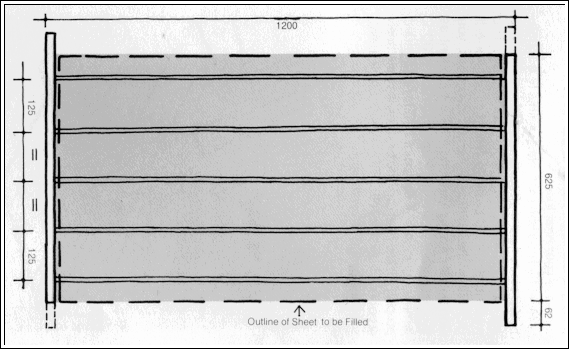
Fig4.28 THE TUBE GRID
The outline of the plate to be fitted is shown in dotted line,as well as altertnating positions for the inlet and outlet.
Most high-carbon matt black paints (e.g.'chalkboard black) wfll suffice. Some of these require a self-etching primer, to get a bond to the metal. The metal itself should be clean, free of oil or grease.
If you follow the, paint supplier's instructions, you won't go far wrong. Bonding is very important, as the absorber can get up to near 100'c temperatures, and if the paint film is not bonded properly, it will peel off.
The best results have been reported with the NEXTEL velvet black paint, supplied by the 3M company.
The collector casing can most readily be fabricated from timber. The depth of the panel will depend on the thickness of insulation you want to use. This should never be less than 50 mm, and more than 1 00 mm is not warranted. In a cold climate, and if the back of the collectors is exposed, 100 mm should be used. Let's say we use 75 mm (in Melbourne or Auckland). In this case the frame can be made out of a 100 x 25 mm timber, as shown in Fig. 4.31.
If the overall dimensions of the absorber plate were (as in the above example) 1200 x 625 mm, then the internal dimensions of this frame should be 121 0 x 635 mm, to allow a clearance of 5mm all around. If you are good in wood-working, you can make dove-tailed corner joints; if not, a glued and nailed or screwed butt-joint will do. Use only galvanised or cadmium-plated nails or screws to avoid rusting.
So, the overall dimensions of the frame would become 1260 x685 mm. Cut a sheet of plywood (waterproof quality) to this size. For our collector size, 6 mm thick plywood is adequate. For a 1200 mm square absorber, 1 0 mm thickness would be suggested. This can be glued and nailed to the back of the frame.
The contact between the absorber plate and the frame should be minimal. The simplest way of supporting the absorber is to get six short pieces (60-80 mm) of 15 mm square beads or quads and nail them to the inside of the frame in the positions shown in Fig. 4.32. The top of these supports should be 80 mm from the bottom of the frame.
You can drill a hole in the frame for one of the absorber outlets; you have to cut a notch for the other. K eep the piece you cut out to make this notch; you can place it back after the absorber is in position. The hole and notch should be slightly oversized, to allow some movement of the absorber plate.
When the frame is ready, it should be painted. An undercoat on all surfaces, plus one coat on the inside and two coats on the outside is the minimum. A white gloss paint is the best to minimise heat emission.
Leave the paint to dry thoroughly. Place the insulation in the case.
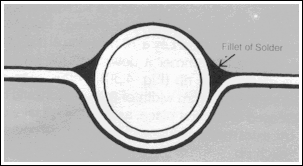
Fig. 4.29 RIBS TO FIT THE TUBE
Close metal-to-metal contact would ensure a better heat conduction.
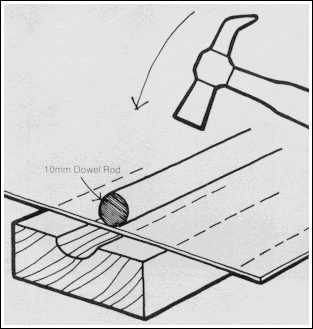
Fig. 4.30 FORMING A RIB
A mould can be formed in a solid piece of timber, and a 10 mm dowel rod hammered down.

Fig. 4.31 SECTION OF COLLECTOR FRAME
A frame made of 100x25 mm timber, with plywood backing.
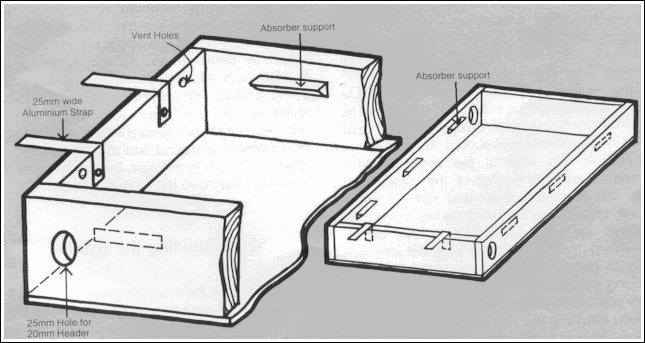
Fig. 4.32 COLLECTOR CASING
Showing the lower end of the frame with the aluminium straps at the bottom to be folded over the glass, and the complete casing with the absorber support beads
You may use a 50 mm ordinary glass-wool batt, but at least the top 25mm should be a low-resin-content glass wool. At high temperatures the resin used.for bonding in the batts can evaporate ('de-gassing') and it will condense on the inside face of the glazing, thus reducing its transmittance. Cover the insulation with aluminium foil or aluminium-faced paper. Do not use a bituminous paper, as this would melt.
Position the absorber, resting it on the six support beads. You can fix it rigidly at one point (centre of one side) by screvang to the bead. Place another six identical beads on top and screw them to the inside of the frame, so that at each of the six points, the edge of the absorber is held between a pair of beads, but it is free to slide. As the absorber heats up and cools down, the thermal expansion can be quite significant.
Drill two small holes (3 mm) in the lower side of the frame above the level of the absorber, to allow 'breathing'. Cut two short pieces (1 00 mm) of a 1 mm X 25 mm aluminium strap, fold down 50 mm and screw to the inside of the lower part of the frame, as shown in Fig. 4.32. These will be folded up over the glass.
Cut a 3 mm sheet glass to a size some 2 mm less than the overall dimensions of the frame. Place a 15-20 mm wide COMPRI-BAND strip along the top edge of the frame.
Alternatively, squeeze a neat and continuous strip of nonhardening glazing compound all around the top edge, using the tube itself or a caulking gun. Silicone putty, a latex, or a butyl caulking compound will be satisfactory. Place the glass sheet on top of this and press it down lightly, keeping the approximately 2 mm clearance from the outer edge of the frame evenly all around.
Take a thin 25 x 38 mm aluminium angle. Cut lengths for the two long sides and for the top. The top two corners should be mitred at 45'. Drill small holes in the vertical leg at about 150 mm centres. Squeeze a thin strip of the same caulking compound along the edge of the glass, press down the aluminium angle and screw it to the outside of the frame.
Fold back the two straps fixed earlier at the lower edge. The absence of any aluminium frame at the lower edge will allow any water to run off freely. You can use the same caulking compound to seal the inlet and outlet pipes against the timber frame.
If you are going to use several collectors in your system, you can build larger collectors by putting two (or more) absorbers into one frame.
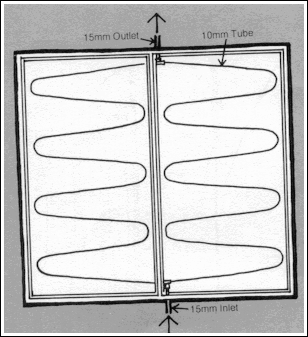
Fig. 4.33 A DOUBLE-ABSORBER COLLECTOR Two serpentine
absorbers fitted into one coilector frame.
Connections: 10/10 - 15 mm 'T'-pieces.
Fig. 4.33 shows how two of the serpentine absorbers (Fig. 4.24) can be mounted into one frame. It is advisable to use 1 0/1 0 to 15 mm T-pieces where connecting the two inlets and the two outlets.
With sheet absorbers, three - or even four absorbers can be mounted in one frame, with close-coupling of the headers. The same applies to the tube-grid type absorbers, but in this case it would be better to use 25 mm tubes for the headers (and not 20 mm as above).
This is shown in Fig. 4.34. On top of the division board the glass sheets should have 1 0 mm seating, with a 5 mm gap between the two glass sheets. Squeeze a strip of caulking compound into this gap and screw down a 25 mm aluminium flat bar to cover the joint and hold down the glass (Fig. 4.35).
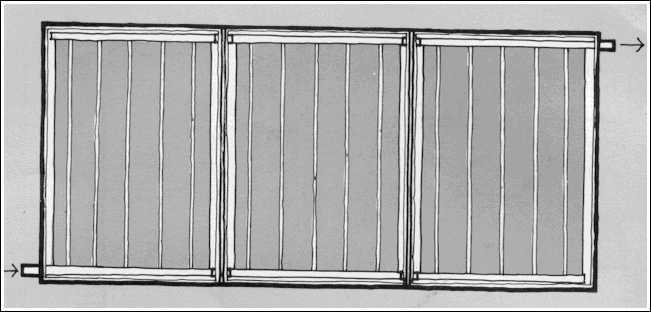
Fig. 4.34 CLOSE-COUPLED ABSORBERS Three tube-grid type absorbers, with direct connection of the headers, mounted in one collector frame.
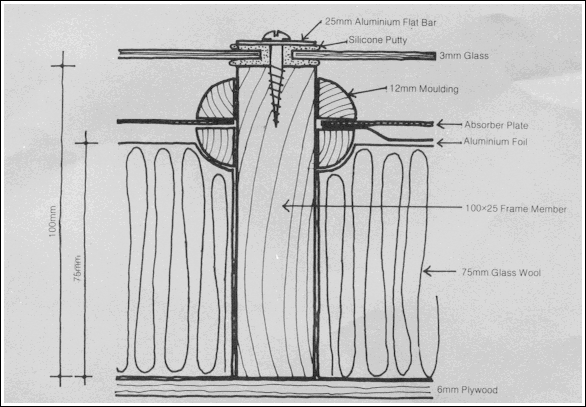
Fig. 4.35 GLASS JOINT OVER AN INTERMEDIATE FRAME MEMBER
Putting together a system having a 380-litre tank and ten absorbers of 0.75 square metres each.
It is unlikely that you would want to build a larger system, and smaller systems would be simpler.
Fig. 4.36 shows diagrammatically the pipe manifolds necessary to connect the collectors:
five double-absorber collector panels (serpentine type);
three collectors with 3,4,3 absorbers (tube grid
or sheet absorbers).
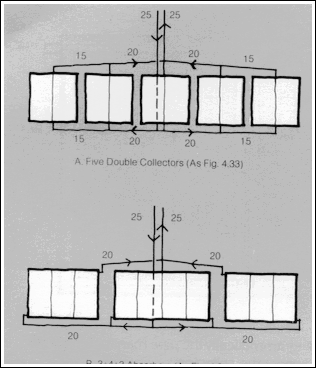
Fig. 4.36 CONNECTION OF COLLECTORS
Two alternatives, with the manifold diameters shown in mm.
The serpentine absorbers are easier to build, but are more suitable for pumped systems. For a thermosiphon system the tube-grid or sheet absorbers will give better results.
Let us say we use a medium tank shape: 0.6 m diameter and 1.34 m height. Fig. 4.37 shows the positions of pipe connections: 20 mm for cold water inlet and hot water outlet, 25 mm for the collector flow and return.
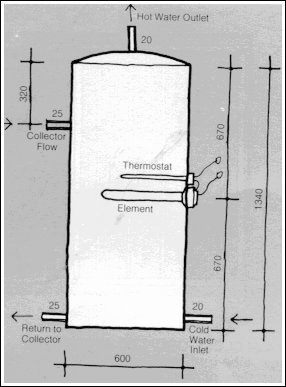
Fig. 4.37 TANK CONNECTIONS
A 380-litre tank Of medium proportions, with the Positions Of inlets and outlets shown. The auxiliary heater element is Positioned for off-peak operation.
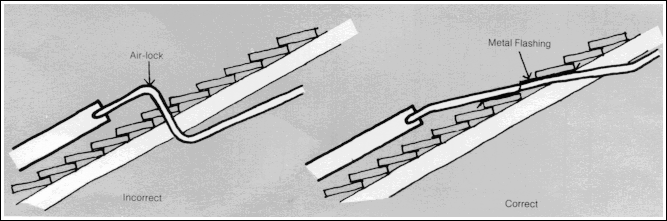
Fig. 4.38 AIR-LOCK FORMATION
All Pipe work must have a continuous Slope. An air lock (or vapour lock) can stop any circulation.
Read this in conjunction with Fig. 4.32.
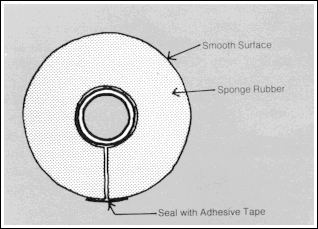
Fig. 4.39 ARMOFLEX or BRADFLEX PIPE INSULATION
A sponge-rubber sleeve, with impervious outer surface
The electric immersion heater element should be located at 1/2 height. This should be 2.2-2.5 kW capacity, controlled by an immersion thermostat located immediately above it and set at between 55 and 57'C.
It is assumed that this wfll be connected to an off-peak electricity supply.
If no such supply is available, it would be worth while to install your own time switch and set it at 7 p.m. for ON and 5 a.m. for OFF-Building a cylinder is a rather specialised job. You would probably be better off buying a readymade one, similar to the above specifications, or getting one made.
It would be futile to give any installation details,beyond some common principles , as these would be different in every situation. A few general comments may, however, be applicable:
I.) Any penetration of the existing roof (for supports and pipes) should be located and made carefully, and should be made good to render it waterproof.
2.) Don't forget that the collectors require not only support but also anchorage, i.e. holding down, or else they may be blown off in a strong wind.
3.) Where the collector sits on the roof, make sure that the roof water can run through underneath and that the collector does not block such flow and does not lead to the accumulation of dirt, leaves, etc. to cause such blockage.
4.) Be careful that the flow and return pipes have a continuous slope. Any dip in the piping (Fig.4.38) can lead to the formation of an airlock (or vapour lock) which may stop any further flow.
5.) All pipework should be well insulated. ARMOFLEX (a sponge-rubber sleeve, Fig. 4.39) maybe some what expensive but it is easy to use and its outer surface is waterproof. Other insulation types would need a waterproof wrapping.
If, in all other respects, you just follow common sense and keep in mind the principles described earlier, you will be able to produce a satisfactory system.


