The Dunlite Wind Power Plant
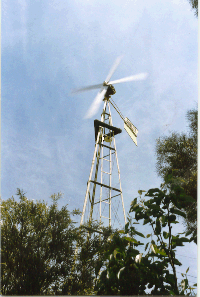
I have a friend called Richard Wood who has a wind generator in the Town of Loxton South Australia.
He acquired it from a farming enterprise that had used it as power source before country South Australia was connected to the South Australian electricity energy grid.
He has it connected to some deep cell batteries he was able to acquire , that were surplus to the Australian Telcom phone company requirements, and has them connected in series to provide a 32 volt source,which is charged from his Dunlite wind generator.
Whilst he has has normal power from the State utility , he also uses the 32 volt power system to provide
additional lights in his house ,and while the rest of the township of Loxton suffers from a power backout after a lightening strike ,Richard is able to see what he is doing from 32 volt lamps he has positioned throughout his house.
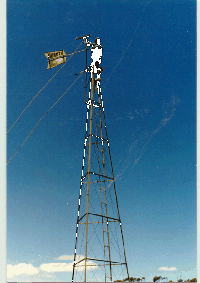
The photo's are of his Dunlite power windmill system,and below is the Dunlite wind power manual reproduced for the interest of others that may have access to a Dunlite Power system although very rare these days.
The information from the manual may also prove enlightening for those that are contemptating using a modern wind power system.
If you have any questions or are interested and maybe have a system operating please send Richard or myself an email . we would like to hear from you .
From the manual
Examine the proposed site to make sure that the Plant will receive the maximum force of the prevailing winds.
Most of the criticism of the unsatisfactory operation of a wind-driven Plant is due to Plants being installed in unsuitable positions or on low towers. No plant will work unless it is in a clear air-stream, and, if a person is not prepared to have a tower of suitable height, it, is better not to install the Plant.
Remember, the plant generates electricity free from the wind, therefore be certain that the Plant clears all obstacles (house roof, trees, etc.) by at least 15-20 feet. Make sure that the Plant is between the house and the direction of the prevailing winds as the roof will cause an upsweep of wind. Any object higher than the plant will cause a disturbance for 300 yards if in front Of plant, and 50-100 yards if behind the plant.
In hilly districts, it is better to put the Plant 200-300 yards away from the house and batteries if a good wind position can be obtained. Forty feet is the minimum height of tower recommended, as the air close to the ground is disturbed, and the charging rate is much steadier and less strain thrown on the plant when up in the clear air-stream.
Where the Plant has to be set amongst trees, a 50 ft. tower is well worth the difference in price, as a much greater and steadier charging rate is obtained and less strain put on the plant.
DUNLITE Plants are designed and manufactured to fit upon steel towers.
You would not use black iron to roof your house, so why use a black or painted steel tower for your DUNLITE Plant?
Galvanizing is the only effective means of rust prevention and whereas the initial cost is slightly higher, that rise is more than compensated.by this permancy thus saving cost of repainting or the unsightly appearance of a rusty tower.
Our standard installation is designed to fit upon a DUNLITE three-post Galvanized Steel Tower. If desired, a fourpost tower cap can be supplied for fitting the Plant upon a four-legged tower.
Open all the bundles of tower and proced to lay out one side on the ground. All the legs are identical, but the ends with the corners ground off are always fitted towards the top.
Undo the bundles of wire braces and sort into Lengths
Commence assembling from the bottom.
Take the longest girt and one of the three longest braces and bolt to the tower legs with the bend in the brace pointing upwards and forming a crossed loop) at the top.
This is most important as an open loop will not tension tower correctly.
The brace is bolted inside the tower leg and the girt outside.
Next take size smaller girt and brace and bolt in a similar manner on next two holes on the leg, the crossed loop again pointing upwards.
Join on two more tower legs and bolt on the third girt.
In this case it will be found that there are six braces of equal length in the bundle, therefore two braces are bolted under each bolt, one facing upwards, and one downwards to meet the centre loop of No. 1 wire brace at centre of No. 2 girt.
When bolting these together, use an inch and a half bolt and bolt the bottom brace on the outside of the girt through centre hole, and the top brace on the inside, with the washer between this latter brace
and,the nut. All braces must be looped around the centre bolt and not just passed over it.
The fourth and fifth girts are assembled identically to the third.
There will be only three wires in the bundle for the sixth girt.
One of these is fitted, and the loop at centre bolt faces downwards to meet the brace front the fourth girt.
Similarly, the. seventh girt has only three wires in the bundle and again one of these is fitted facing downwards.
However, there are six single wires left and one of these is bolted under each bolt of the seventh girt facing upwards.
These are crossed over and bolted on to the eight girt.
The other two sides are assembled on to the first side and in a similiar manner.
While assembling the tower, do not tighten any of the bolts further than a full nut.
When the tower is completely assembled always tighen centre bolts first and then the ones on the legs.
The ladder sections can then be assembled the small section bolting on to the eight girt and the others bolting down the tower.
Supplied with the Plant are three pieces of 1 in. x 1/4 inch flat mild steel
with a right angle bend.
These are bolted hanging downwards under alternate bolts on the top girt and are used for supporting the platform. Also, there are two pieces of 5 ft. galvanized angle with the tower.
These are bolted between the centres of the first and second girt on the two sides opposite to the ladder.
The anchor plates are then bolted to the anchor posts and holes dug so that the bolts to tower legs are just above ground level.
The tower can then be raised by tractor or suitable winch and bolted to anchor posts, care being taken to see that it is carefully guyed during this process. Guy ropes should be left in position until concrete has hardened.
NOTE.-These anchors are for concrete only and the holes should be made larger at the bottom than the top and completely filled with concrete after the tower is levelled.
Similar instructions apply to 50 ft. towers-the method of assembly, centre girts being identical to girts 3, 4, and 5.
It is recommended that the services of a qualified windmill man be obtained, if possible, for this work, as the tower will be weakened if not correctly assembled.
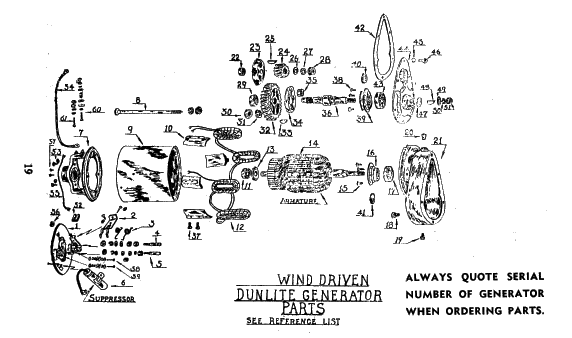
This is sent front the factory in one piece, and it is only necessary to fit to the hub.
Fit bolts through front cover plate and propeller and mount on hub after the generator is fitted to head assembly placing the nuts and spring washers at back of hub
Tighten bolts evenly and check these periodically as the wood may shrink with age.
Note.-Flat face of propeller is nearest generator.
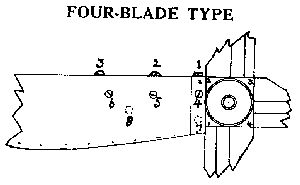
All four blades are stamped with a number near the centre and the arms of the hub are also numbered.
Slide No.1 blade on the corresponding arm of the hub until the screw holes are properly in line. Then start screws Nos. 1,2, 3 (see sketch above), and tighten these three screws right tip tight. This draws the blade tight against the hub, and allows the remaining screws to be put in easily.
This procedure is very important, as it is similar to that used in the manufacture of the blades. Proceed to fix the other blades in a similar fashion, and make sure that all screws are dead tight.
Failure to follow above directions will throw propeller .out of balance.
ERECTION OF TOWER
Full instructions are provided with tower and these should be strictly adhered to when building up tower.
When using the DUNLITE type of tower, care must be exercise that the three strapes use for supporting the platform, and are supplied with the Plant, are placed in position between the legs of the tower and the top girt.
Also brace wires should be bound with thin wire or insulation tape to prevent vibration in strong winds.
TOWER CAP
This provides a means of levelling the Plant, irrespective of the angle of the tower. It is usually fitted before the tower is erected.
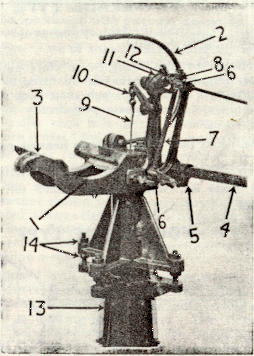
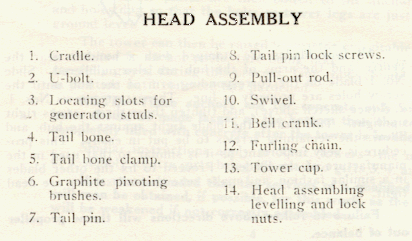
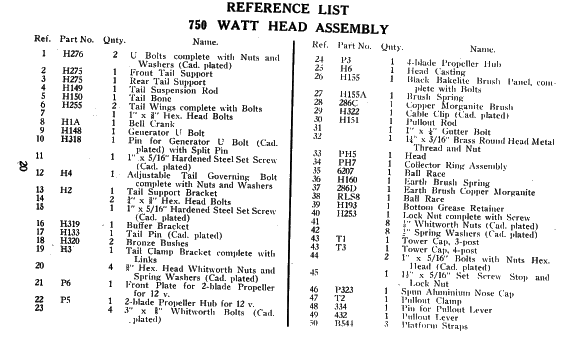
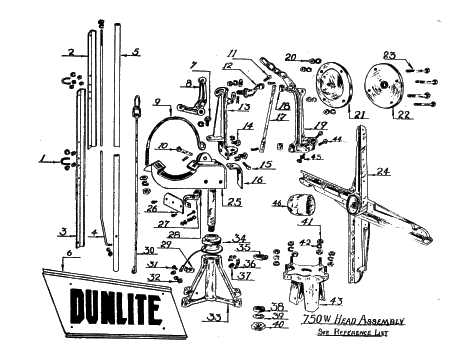
HEAD ASSEMBLY
Remove top nuts from the four studs on tower caps.
Place head assembly on these four studs with the G and C,+ terminals in the most convenient positions for running the wires down tower.
LEVELLING HEAD ASSEMBLY
This is done bv fitting generator to head assembly (see Fitting Generator instructions).
The head assembly is mounted on sensitive ball bearings, nd should the base of head assembly not be level, the generator will swing to side which is lowest.
The level is adjusted by moving the lock nuts,both upper andlower, on tower cap until the generator will remain in any position. When the correct position is attained tighten nuts, SECURELY.
TAIL
The tail bone is sent from the factory fitted with suspension bar and pivot bracket.
It will be necessary to assembe tail wings and angles and to bolt them to tail bone.
The angle irons of tail are placed ncross the tail wings with the flat side of angle iron out, and are then bolted with 1/4 inch galvanized bolts, after placing a galvanized washer between the wing and angle iron on each bolt.
These washers prevent the wings from vibrating against angle irons.
Bolt the assembled tail wings to the tail bone by means of the small U-bolts; setting the tail as far back along the bone as possible.
The tail is then fixed to the head assembly by means of the tail pin and the tail pin lock screws are then securely tightened.
Furling chain is then hooked to the bell crank. care being taken that the chain lies flat and is not twisted.
The furling wire is the only means of switching the Plant out of the wind. Therefore make sure that a good heavy wire (No. 8 gauge) is used and securely fastened to the swivel on the end of the pull-out rod.
If this is not available, use two strands of lighter wire. This is most important as, should the wire break in a heavy wind, the batteries will be over charged. Should the wire break in a heavy wind, lights should
be switched on to overcome this. On no account attempt to disconnect batteries with Plant running at any time.
The wiring from the Plant to the batteries should be carried out with 7/.036 wire for short distances. When plant is installed long distances refer voltage drop chart on back. cover.(sorry unable to find this)
The positive lead is taken from the lug on the end of the wire coming from the pick-up on the head assembly. A cross arm to take the leads to the battery room should be fitted about 25 feet up the tower, and the positive lead brought down, using insulators so that the lead does not fray against the tower.
The negative lead is connected to terminal on the side of the head assembly base (near positive connection-see illustration.9), and also run down the leg to another insulator on the cross arm.
The two wires are then run across to the battery room, and suitably fixed and insulated, and the leads then run to the Relay.
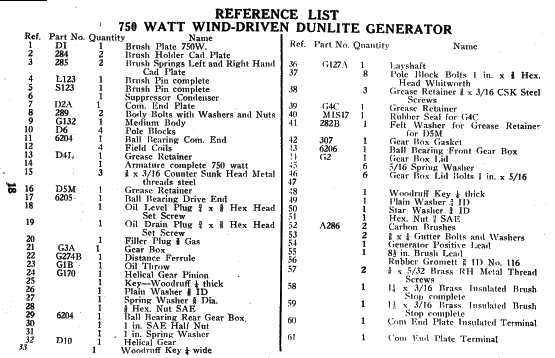
32-VOLT GEARED
Sit generator in the cradle so that the gear box hangs at about 5 o'clock position (About two inches front vertical away from head asembly.)
The pole block set screws on the generator should be made to engage in the locating slots in the head assembly (see illustration ). This prevents any movement of the the generator should the U-bolt be loose.
Do Not forget the plain washer and spring washer before the nut on the U-Bolt. Tighten securely.
The lead wire from the generator is connected to the terminal under the cradle. Take care that this lead does not foul the tail in the furled position.
Plants are sent from the factory with the gear boxes filled with suitable oil. This oil is suitable for 4-5 Years running.
When replacing or renewing oil, use Mobil 3L or similar grade gear oil.
This is fitted to cradle with serial number on top at drive end so that the end plate flanges fit inside the raised suports on the end of the cradle.
This prevents the generator moving backwards and forwards.
Connect up in a similar manner to the 32 volt Plant
Several types of relays are employed but in each case the connections are plainly marked.
ABBREVIATIONS
used on relays are as under
G+ Generator Positive
G- Generator Negative
B+ Battery Positive
B- Battery Negative.
L+ Lights Positive.
L- Lights Negative.
Connect the two wires from the Plant to the generator terminals of the Relay taking care that they are not reversed in any,way (that is.do not connect positive lead to negative terminal).
The batteries connects to the B+ to B- terminals.
The house lights should be connected to the load terminals through a switch and fuse.
IMPORTANT!
The relay used with this plate is a selenium dry rectifier and has no moving parts or adjustments
The following special points should be carefully observed:-
1.The relay should not be used at maximum charging rate when the temperature is -tbove 108 deg. F.
2. The relay must be mounted in a ventilated position and the space between the ventilating fins kept free from cobwebs. etc.
3.As the Plates are alive they must not be touched with any metal objects without first stopping the Plant and removing battery leads.
4.Never attempt to dismantle unit or allow it to become damp.
5.Never exceed maximum charging rate.
The selenium rectifier will give long, trouble-free service if the above points are adhered to and is free of all mechanical and electrical interference.
Before letting the Plant into the wind, check all wiring and connections.
When a DUNLLTE Plant is installed where there is an existing engine-driven unit,great care must be taken to see that there, is no earth in the wiring or engine. This is most important as the Tower of the Dunlite is
connected to the negative of the Generator
Should a positive wire of the installation be touching any earth metal there will be a leakage of current through the ground to the ground to the tower.
This will cause the batteries to keep running down and will eventually corrode away the legs of the tower. It can also cause relay trouble and depolarize the generator.
To test for this procced as follows
After the plant is erected and the relay mounted connect the battery positive and negative wires to the relay, but not the wires from the generator.
Then with voltmeter test between battery positive and generator negative wire and also battery negative and generator negative wire.
If the system is in good order, no reading will be obtained in either case.
If a reading is seen in the first test it will mean an earth in the negative side of the installation and will not cause damage,However if a reading is obtained from the battery negative to the generator negative, it will indicate an earth oil the positive side and must be located and removed before connecting the Plant.
If no voltmeter is available low wattage could be used.
Where there is an existing Plant, the relay battery terminals should be connected direct to the battterv terminals and not through existing switchboard.
No wiring is connected to the load terminals and the amppeter will only show charging current,the lighting load discharge being shown on the existing ammeter.
The engine and wind plant can be run either independently or together, but the latter is not recommended as the charging rate to the battery would be too high.
FURLING LEVER
Release propeller into the wind by allowing the lever to rise SLOWLY batteries
in The generator will then comemnce to charge the accordance with the wind pressure.
The charge rate is read on the ammeter,situated above the cutout.
Leave the plant operating until the batteries are fully charged, then stop Plant by pulling down the furling lever
TO TEST BATTERIES
Use hydrometer supplied. Unscrew caps from batteries,
insert the hydrometer, squeeze the bulb, and then, by releasing slowly,the
Electroyle will rise in the glass tube and and the float will rise in the
Electrolyte.
Read at the Electrolyte level. The Specific Gravity of a fully charged battery is 12.50 (Yellow) 12.00 (Blue), half charged:and 11.50 (Red) discharged.
TO ADJUST CHARGING RATE
This is controlled solely the tail and is varied by moving the top tail
Suspension lever in the slot. Move away from generator to increase the charge rate.
This should be set in accordance with the type of batteries used.
See recomendation of charging rate from battery manufacturer.
Tighten tail pin set screws after adjusting.
GREASING
The Plant is equipped throughout with grease packed ball and roller races and requires no attention for a period of 4- 5 years.
They should then be taken down, old grease washed out,and re-packed with Mobil grease No. 5, supplies of which can be obtained from your nearest DUNLITE Distributor.
The tail is swung upon Graphite labricated bushes. which require no lubrication.
For geared Plants. see Previous information.
BRUSHES.
These should be inspected periodically (about every 6 months) and replaced when worn to about 1/2 inch in length.
To change brushes. loosen the screw fixing the brush to holder. slide old brush out and new one into position and tighten screw.
When inspecting brushes check brush holders for freeness and tension.When brush is lifted 1/2 inch from face of commutator and let go it should go back with a sharp click.Correct brush pressure (measured on brush face)is 6 ozs.
When renewing always use genuine DUNLITE brushes.
COMMUTATOR.
This is made from hand drawn copper bar and provides that the rest of the system is kept in order,should only need refacing at every complete generator overhaul. After any refacing the mica must be undercut .030 inches.
When in use the commutator will develop a dark glaze finish.
This is beneficial to the brush life and should not be removed.
Should the commutator to show signs of burning or flat spots it would be due to the following.
(a) Excessive Charging Rate.
If the plant exceeds the rated output of 20 amps
the governing should be adjusted immediately (refer previous information.)
(b) Brushes Worn Out.
The brush holders are fitted with stops that prevent them from damaging the commutator when the brush is worn out.
Thus when the brush is worn out, it will be off the commutator and will cause considerable arcing.
This will be noticed by the ammeter needle flunctuating when the plant is charging.
(c) Faulty Battery Connections.
These allow the voltage to vary and if allowed to be unchecked will cause blown globes or even exploded batteries.
Check all connections periodically by feeling each after the plant has been charging for an hour or so. If any feel warn,it indcates a bad connection and the lugs should be removed and thoroughly cleaned.
Make sure plant is turned off before doing this.
(d) Faulty Brushes.
Certain types of carbon will cause rapid commutator
wear, whilst others will cause burning.
Be sure genuine factory approved brushes tre fitted.
BEARINGS.
We recommend dismantling the generator every four-five years.
The bearings and housings should be carefully washed out with clean petrol and the bearing repacked with a good quality bearing grease.(Mobil grease no 5).
When the propeller is tightened, no end play should be in the generator or lay shaft.
Should end play develop immediate steps should be taken to dismantle generator and find the cause otherwise the shaft may wear and cause extensive damage to gears and windings.
WINDINGS.
Windings are very heavy and with a big safety factor.
Should an armature burn out. the fault will be due to excessive
charging rate. After repairing,, check governing carefully.
Should the field coils burn out, it will be due to the
generator running on open circuit.
This could be due to any of the following:-
(a) Broken wiring.
(b) Collector brush worn out.
(c) Battery charger not properly used (read instructions
carefully.).
(d) Faulty relay.
(e) Faulty batttery connections.
RADIO INTERFERENCE SUPPRESSOR.
This is fitted on the brush plate and connect to the
positive brush holder. Should a fault develop in this,
it can short the generator and sometimes cause damage to the
relay. If this is suspected of causing trouble, it can be
disconnected from the brush holder.
GENERATOR POLARITY.
As these generator -are cumulative compound wound, any attempt to make them run as a motor without disconnecting the series field will cause them to depolarize.
This means that although generator still appears to be generating , the positive and negative terminals have reversed and the relay (which is a polarized unit) will not,operate.
HOW TO REPOLARIZE GENERATOR.
Connect relay in ordinary manner and then remove the cover band
from the generator and place a piece of paper or rag under the brushes so that they do not touch the commutator.
Then, with a screwdriver bridge the generator positive and load positive terminals on the relay. A slight flash will occur and should show about 1 to 2 amps discharge on the ammeter.
Hold the screwdriver across the terminals for about 2 seconds, then the paper can be removed from under the brushes and cover band refitted.
The generator should then charge in the correct polarity.
CAUSES OF DEPOLARIZATION.
A generator can become depolarized through any of the following:-
(a) Faulty relay holding in and allowing the battery
current to run back into generator.
(b) Attempt to motor generator.
(c) Leads from battery charger allowed to touch main
battery terminals.
(d) Short-circiuit in wiring from generator to relay.
FINALLY.
ALWAYS see that propeller is fitted correctly and the nut as TIGHT as possible.
This should be checked after a few weeks running as they are subject to severe pressure and should they be
allowed to slacken will cause damage to the bearings and shaft.
TO TEST PLANT WITHOUT USING TEST METERS IF PLANT WILL NOT CHARGE
1. (a) Check all wiring and see that all connections are correct, clean and tight.
(b) Check battery terminals for corrosion and loose connections.
(c) If a battery charger is fitted, see that the switch is in normal position.
2. If the above all appear in good condition, remove the cover from the relay terminals, allow the plant to run in the wind and with a piece of wire short the generator positive and negative terminals on the relay.
If a flash occurrs, it indicates that the generator is charging and the fault is either that (a) the generator is depolarized or (b) the relay is at fault.
(a) To test for depolarisation reverse the generator positive and negative leads on the relay and allow the
plant to run in the wind. If it now charges O.K.,reconnect wires in the original position and repolarize,.
generator. (See instructions previously.)
(1) If the plant will not charge after reversing the leads,the fault will probably be in the relay. A fuse link is fitted at the back of some units and this should be examined. If this is blown it would indicate that (a) the charging rate is too high, or (b) there is a short circuit in the wiring to the generator.
(See instructions on relays.)
3.If no flash occurs in test 2, it would appear that no current is coming from the generator, so proceed as follows:-
Remove generator cover and see that brushes are not worn out and are seating correctly on the commutator and that all leads appear in order.
Clean commutator with fine sand paper.
Check collector brush on head assembly.
Then test plant as outlined in paragraph 2.
If still no flash is seen. switch plant out of wind and lift negative (earth) brush from commutator and pack a piece of paper or cardboard under it to prevent it touching the commutator.
Then take a small piece of wire and join the load positive and generator positive terminals on the relay and
note results.
If no flash occurs or no discharge shows on the meter it would indicate a faulty connection in the
wiring of the generator.
Check this by carefully by examining all wiring, joints, and collector brush.
If all these are in order, the fault is probably in the fields and the generator will need dismantling.
(1)) If a slight flash occurs and a discharges of 1 amp.
(1/2 amp on 12 volt plants)
shows it will indicate the wiring and field coils are in order and the trouble probably in armature of generator.
(c) If a large flash occurs and heavy discharge show,it would indicate a short circuit in wiring of generator. This can be ascertained by disconnecting generator lead at main generator terminal and testing again.
If all wiring shows clear with generator, disconnected,try disconnecting radio interference suppressor from positive brush holder, re-connect generator lead and test again.
If heavy discharge still shows, it will indicate breakdown in generator.
SPECIAL NOTE.
DUNLITE wind-driven generators are all compound wound and will not run as a motor. Therefore on no account attempt to do this, otherwise considerable damage will be done to relay and generator.
The repairs to generators and relays should only be undertaken by a skilled electrician and in accordance with the data supplied by this Company.
CARE AND ATTENTION OF BATTERIES
The batteries are the reservoir of your electric Supply-.
Treat them well and they will give you many years of service; abuse them and their lifetime will be diminished.
Keep the level of Electrolyte half an inch above the plates by adding pure distilled water.
You will find that this is necessary more often in Summer, when evaporation is increased.
Avoid spilling the Electrolyte and keep the top of batteries free from dust and moisture.
A smear of good quality grease across the terminals will lessen corrosion.
On no account must batteries be used as a shelf for unwanted articles, as this practice is injurious to both
batteries and self.
A slight overcharge should be given at least every two months, of between four, and six hours. Avoid excessive draining of the batteries.
WARNING! Keep all naked lights away from batteries as explosions are liable to occur.
Test your batteries regularly with Your hydrometer.
BATTERY CONNECTIONS MUST BE KEPT CLEAN AND TIGHT.
Failure to do this will cause lights to come excessively
bright when generator is charging.
Can also cause serious damage to plant and relay.
About a week after installation, cheek over Plant and Tower. and tighten all nuts and bolts.
Never allow Plant to run with the batteries disconnected.
Neglect of this will cause globes to be blown,and possible damage to generator.
The generator is not made to run as a motor: atttempting to use as a motor will result in
generator being depolarized..
A slight squeak in generator is sometimes noticed, usually when at low speeds.
This is a brush noise only, and causes no harming in the operating of the Plant.
See that maximum charging rate of 20 amps is never exceeded or damage will be caused to generator and relay.
If charging rate is too high alter governing as on described previously.
Should trouble develop, always switch plant out of wind immediately until fault is rectified.
Geoff Egel 18 Sturt Street, Loxton ,5333, South Australia ,Australia