
My Experiments with hydrogen/oxygen gas part 2. By Geoff Egel
A word of warning
If you fill a closed container with an explosive gas mixture, as an example one (1) part oxygen and two (2) parts hydrogen you will have set the stage for accidental explosion.
Hydrogen and oxygen can and will explode with violent effect.
To know of this, and to teach this, and not carefully warn all parties is to ignore your place as scientific ethical investigator.
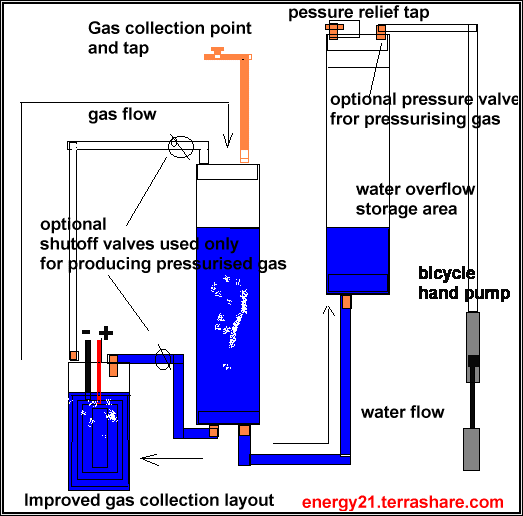
The connections coming out of the end caps remain the same but how they are connected are slightly different.
With gas collector laying on its side there seems to be a problem with gas also blowing the left over water in the plastic pipe with the gas.
With this new method gas now enters at top of storm water pipe and pushes water down under pressure into the water holding pipe.
The gas output collect area is also located at the top of the gas storage collector and there should not be so much of a problem now with water blown out with the gas.
There are also two connections on the bottom of gas collector and this enables water to be returned to gas producer and any access sent to the water holding tank.
A end cap can also be placed over the water storage area to help as an aid to slightly pressure the gas.
A slight enhancement although not shown, would be to place a non return gas valve (something like a bicycle tyre valve ) in the top of the water storage pipe, and by this means of a simple bike pump you could pressure the gas at output point,into say something like a balloon.
I would also recommend an output tap located here at this position also, to allow you to release the air pressure you put into the water storage vessel,so that you get the unit operating again when you exhaust the gas and allow the water level to reset to correct position.
This may not be needed but I think when pressurizing in this way, two move shutoff valves should also be placed as shown in the diagram to stop excess pressure reaching the gas producing unit .
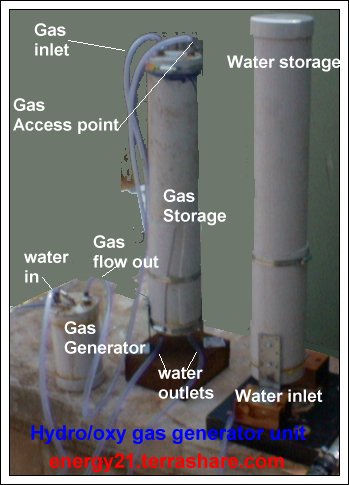
I have been asked to describe the gas producing unit in details.
If you look at the following photographs you will see how the cell is constructed.
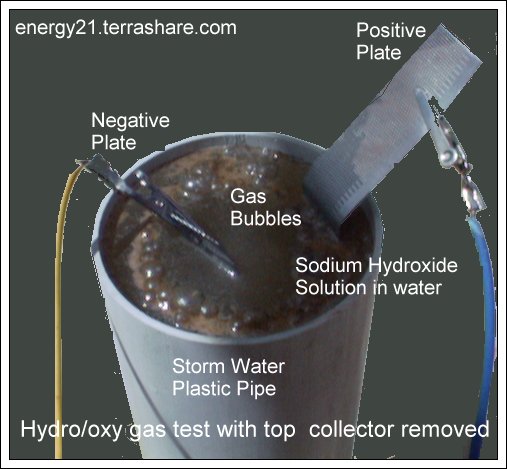
It consists of four cylinders of stainless steel ,the photo below show the unit in operation and you can see bubbles of gas forming on the surface.
The bubbles have a dirty appearance due the fact the stainless steel was dirty to start will and I run it first to clean the steel up and then remove the water from the cell and then replace.
The water also has some potassium hydroxide (lye or caustic soda are other names it is known by)
THIS INFORMATION IS SUPPLIED FOR EDUCATION PURPOSES ONLY AND NO RESPONSIBLY WILL ACCEPTED BY THIS AUTHOR FOR ITS MISUSE.
Have Fun and be care full
Copyright Geoff Egel 2000
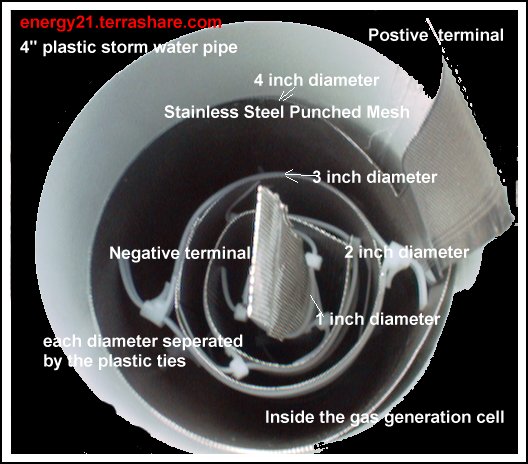
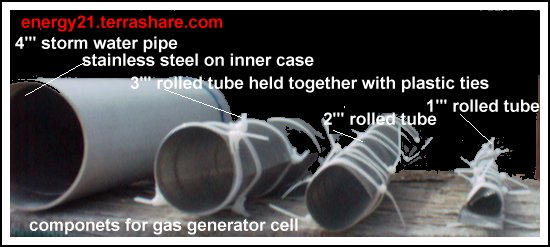
Pictured below is how the cell is constructed before the water solution is added. In the previous unit I have used plastic tubing to keep the stainless cylinders apart and used stainless steel wire to form the cylinder.
I discover by accident that I could use tie's to hold the cylinders together and if I cut the plastic tails correctly I could also use these as spacers in place of the plastic tubing and it worked better as well.
part six of this article warning please read first
