
The Konzen Pulse Motor
A previous article on this device
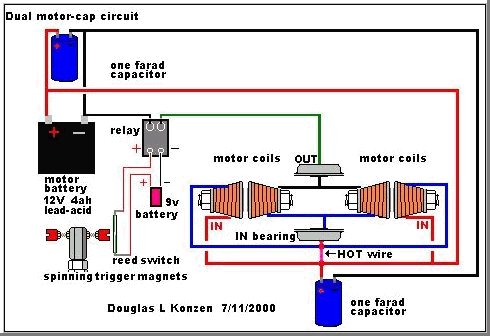
NEW DUAL-CAP CIRCUIT BEING USED NOW IN TESTS:
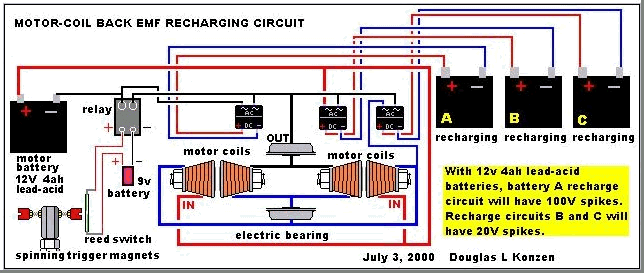
RECYCLING ENERGY:
Important and very useful back-EMF recirculation circuits extracting from the MOTOR coils - this can charge-up three batteries as the motor drains another one - a switching circuit can then be made to keep the battery supplying power to the motor always fresh. Add the output of the pickup windings, high-voltage "splatter" coils and then the output of the shaft and you will have over-unity from this motor design:
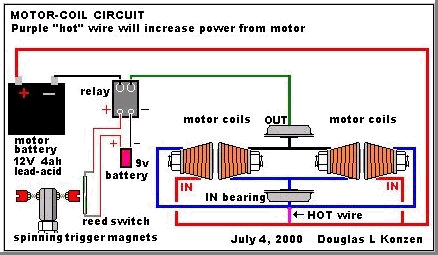
New motor circuit with no back EMF circuits shown for simplicitys sake...NOTE purple "bypass" wire - this will greatly increase the power of the motor:
Here is the up-to-the-minute circuit I use right now - the very big caps in the circuit shown lower the current-draw in the pulses to the motor to only .5 amp sawtooth peaks to the pulse that enters the motor as seen on an oscilloscope.
Considering that the volts-applied is 12V and a 10% duty cycle, this means the "MEAN" WATTS INPUT would be approximated with this formula considering the the pulses to be square waves for simple math:
12Volts X .5Amps X .1 duty cycle = .6WATTS INPUT
PRONY BRAKE TEST OF NEW MOTOR USING NEW CIRCUIT:
Under load at 800rpm, the motors shaft will push 10 grams on the one-foot prony brake. This translates to 2.2watts output form the shaft in mechanical power at this speed and load.
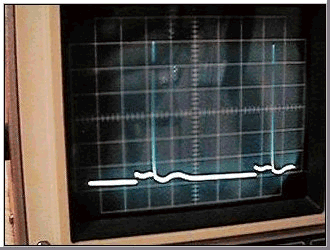
MORE SCOPE SHOTS:
NOTE: THESE SCOPE SHOTS ARE OUTDATED RIGHT NOW!! THE NEWEST MOTOR WITH THE DUAL CAP CIRCUIT ONLLY CREATES PULSES OF APPROX .5AMP PEAKS --- 5 times more efficient than what is shown below!!!!!
These scope shots should answer questions about what the watts-in and some of the watts-out potential of this motor actually is.
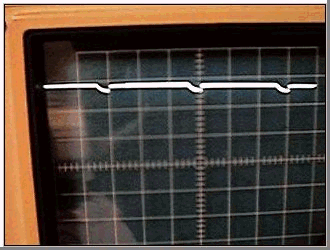
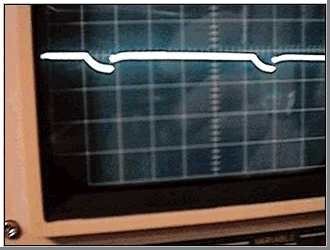
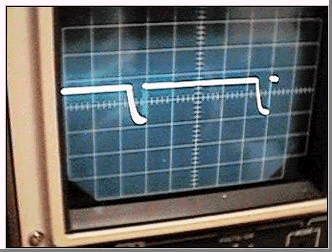
PICKUP WINDING OUTPUT:
Here is how the already rectified (2A 400V rectifier)from AC to DC voltage and amps looks on a scope generated by the PICKUP windings of just the spinning rotor. The voltage and amps draw to the motor itself - what it takes to run it - are shown below these photos.
When checking the VOLTAGE output of the PICKUP COILS, the scope probe leads are across the output leads of the pickup windings.
To check for the AMPERAGE of the pickup windings, the scope leads are across a .01 resistor-shunt which is connected to the output leads of the pickup windings.
The scale of the shunt is 50mv = 5 amps so this means the 8mv peak and 2mv power pulse shown in the AMPERAGE photo would correspond to .8 amps for the peak, and .2 amps for the power pulse.
VOLTAGE FROM ROTOR PICKUP COILS:
(Scope divisions are 10V and 2ms)
AMPERAGE FROM ROTOR PICKUP COILS:
(Scope divisions here are of 10mv and 2ms using .01 shunt)
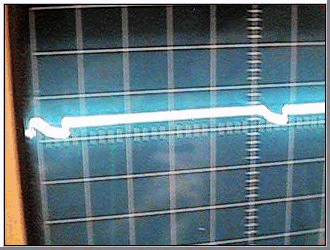
WATTS-DRAW OF MOTOR USING SCOPE SHOTS:
Here is the answer to: How many watts does this motor draw?
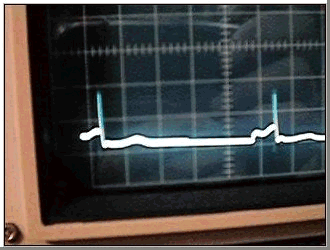
So see for yourself; in the VOLTAGE-draw photo, the scope-divisions are set at .5V and 5ms... The probe-leads are across the motor-battery in the VOLTAGE-draw photo.
In the AMPERAGE-draw photo of the motor-battery, the scope probe-leads are instead across a .01 resistor-shunt in series from the battery to the motor. The scale of this shunt is 50mv = 5 amps, so the amperage-pulse shown in the photo of a 25mv draw corresponds to a peak-amp-draw of 2.5 amps for the same 1.75ms pulse.
In the AMPERAGE-draw of motor battery photo, the scope divisions are set at 2ms and 50mv.
The duty cycle is calculated at approx. 10% for these tests. Please study the photos below:
VOLTAGE:
AMPERAGE:
NOTE:
The watts-draw to the motor in simplified math, first by disregarding the extreme peaks, and again making the pulses into simple square-waves would be this:
Considering a 10% duty cycle, 11.2V(taken across battery) x 2.5A x .10 duty cycle = estimated 2.8WATTS DRAW into the motor during these tests.
There is still the stator coils pickup coil output to look at too - later on that.
NEW DETAILS:
There is now a lot of weight in copper windings and iron cores being slung around by the rotor - I have had to make a harness out of heavy-duty nylon wire ties to combat this force:
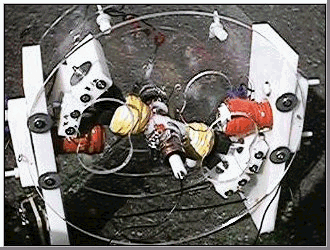
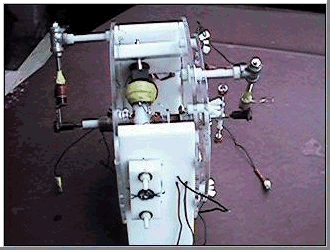
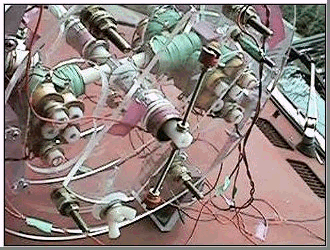
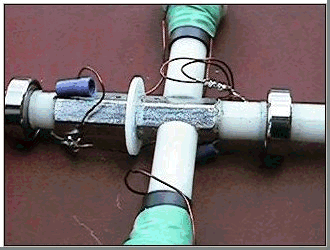
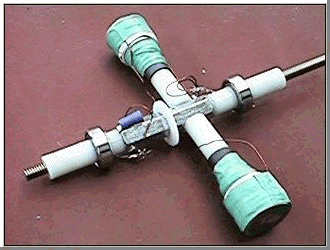
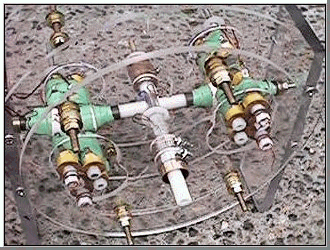
LATEST MOTOR PHOTOS:
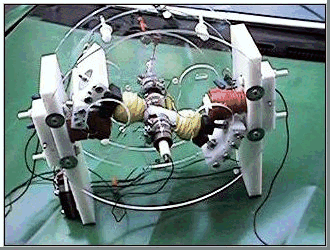
This motor has 3/4" thick iron electromagnet cores made of welding-rod instead of ferrite/steel - there are NO "splatter-style" pickup coils on this motor (yet) - it instead has 18-gauge thick-wired "pickup" windings wrapped around and behind the "motor" coils.
These sort of pickup coils put out good amps, and the current can be rectified and fed into caps easily without any spark-gaps or HV components.
Here is an inside-shot of the rotor and stator coils in this newest motor. (labeled "cthru2") Note how fat the coils look - the actual "motor" coil is way inside of them, and is wrapped around and behind with lots of "pickup" windings to make them look like this:
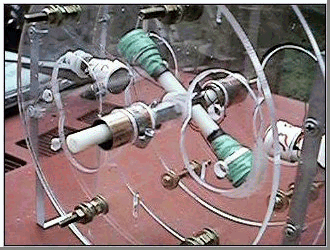
Here is the back-side of this same motor, showing the reed-switch/spinning magnet timing mechanism:
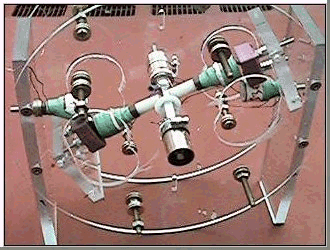
Here is another front-view:
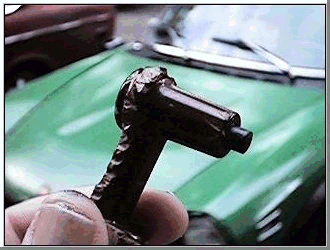
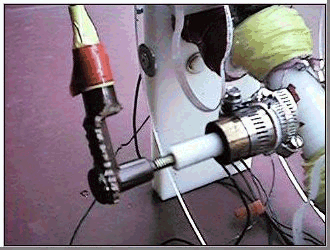
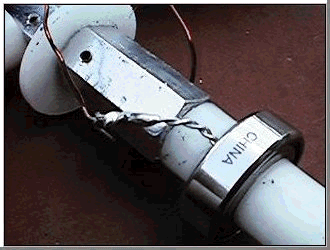
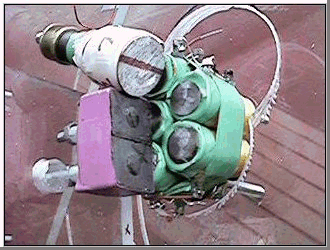
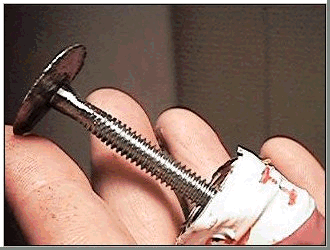
This photo is of the spring-loaded carbon contact inside a regular car distributor cap cut-out and made into a simple component that will extract current from the ends of the axle in this motor - the idea is for the pickup-coil output to be taken through these, while the motor-coil feed goes through the bearings...
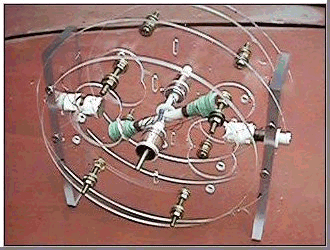
Here is picture of the Cthru2 motor with the car distributor contacts mounted onto the motor:
Here is close-up of the front brass axle-end extracting the spinning rotor AC pickup windings current through the carbon car distributor contacts... this works really great and doesnt seem to slow th motor at all - in fact it snugs both ends of the axle together so it spins straighter on the bearings if anything:
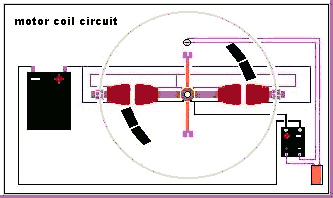
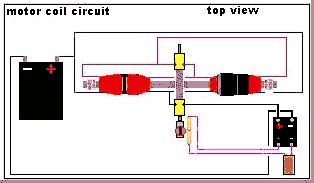
CIRCUITS:
Here are some circuits of this motor to understand. Please note that a large capacitor in parallel with the battery will greatly improve the performance of this motor but is not shown in these circuits:
MOTOR-CAPACITOR
Here is something showing the importance of having a capacitor across the battery powering the motor - the particular one used in these tests is a 100000uf 25V cap in paralell with the 12V4ah battery. This size works very good with the motor being tested using motor-coil windings of 40ft of #22 gauge magnetic wire...Look at the difference the cap makes - nearly cutting the volts-draw to the motor in half! Larger caps will lower the volts even more... There is also more rpms and power... note that these shots also do not have a spark-gap feed occuring like shown in the photos above and there is no positive pulse following the first pulse:
With cap:
Without a cap - straight battery feed:
I answer all my emails about this motor project or my cell phone is (206)226-1983
MOST RECENT PHOTOS:
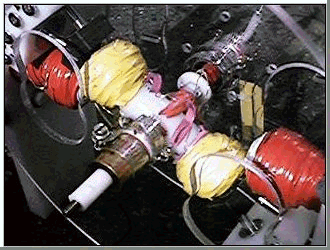
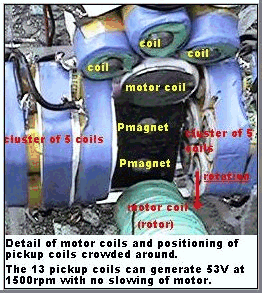
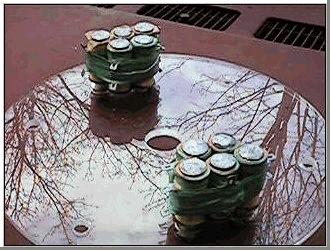
Here is the very latest positioning of pickup/splatter coils around the stator "motor" coil:
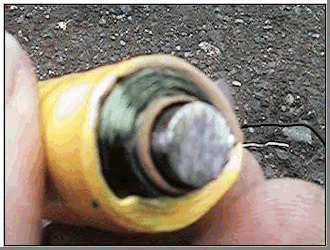
Here is photo of a close-up of a pickup/splatter coil with an iron core (5/16"welding stock) and very thin windings:
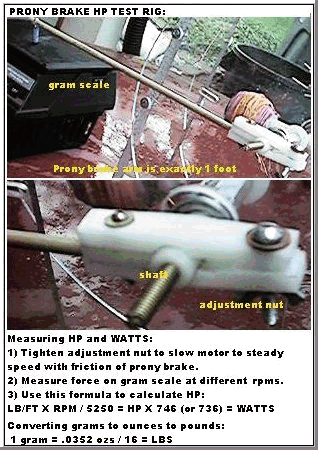
HORSEPOWER TESTS:
Study below on how to test for HP:
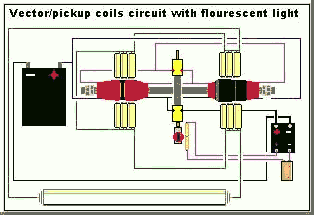
LIGHTING FLOURESCENT BULBS WITH VECTORING ENERGY:
This is a new direction in the motor project - harnessing the electromagnetic-flux-energy "splatter" or "vectoring flux lines" of the colliding motor coils through pickup coils mounted at 90 degrees from the gap between the colliding coils. This energy seems to be amplified and accelerated from the coils-collision!
Collecting this energy has no affect on the speed or power of the motor and right now can produce spikes of 240-300volts. this is HV and dangerous to work with - rubber gloves are a must when testing this low-amp high-voltage "splatter energy".
The "C-thru" motor has lit up four 15 watt flourescent bulbs in series at 2500 rpm/24V input (this is at 24V please note) from the high voltage emitting from the four clusters of "splatter coils" mounted 90 degrees next to the air gap of the N-N electromagnetic colliding and pulsing "motor" coils.
Here is a photo of the insides of a new "C-thru" motor; note how there are two clusters of pickup/splatter coils, one on each side of one of the stator motor coils. (these should contain and catch almost all the vectoring "just in a head-on collision" electromagnetism)
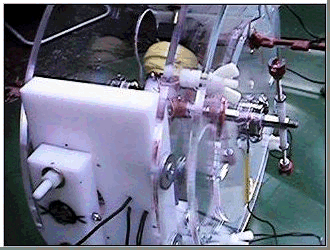
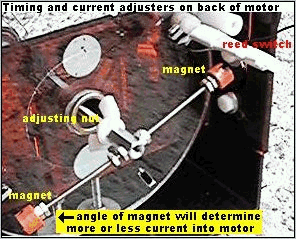
ADJUSTABLE TIMING:
The photo below shows the adjustable timing mechanism using two spinning magnets that trigger a magnetic reed switch that in turn trips a mosfet relay in order to send the pulse-current into the motor-coils.
The magnetic reed switch is held in place by an adjustable plastic plate that changes the timing of the firings by simply rotating the plate.
PERMANENT MAGNETS IN ROTATION FOR MORE POWER:
Here is a view of permanent magnets (purple) mounted just past the stator motor-coils in the rotation that provide a lot more power through the smacking oscillations of the energized rotor bouncing off them. These magnets can double triple the torque and speed of the motor and add no extra current draw!!
This motor has a total of 20 pickup/splatter coils in clusters of 5 mounted with clear plastic plates. Here is a photo of a plastic plate with two clusters mounted on it:
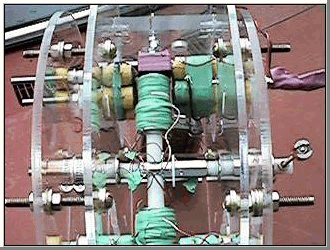
Here are four more photos detailing some of the construction:
Electric bearing detail:
The newest chassis/rotor:
Another photo of chassis/rotor:
A photo of a motor coil, a permanent magnet flux bridge, and one of the pickup coil clusters mounted on the motor:
Top view with rotors and stator motor-coils in free-rotating position:
Top view with rotors and stator motor-coils in energized (power) position:

Another view...clusters of pickup/splatter coils collect magnetic energy vectoring away from the colliding (and rotating!) flux lines of the "motor" coils:
View of motor without "pickup/splatter" coils installed:
Another view with NO pickup/splatter coils:
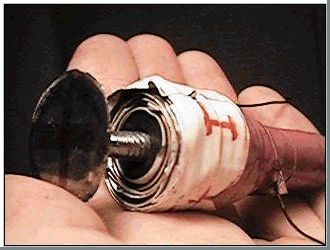
MOTOR COIL CONSTRUCTION:
These photos show how a "motor" (NOT pickup/splatter!)coil is constructed using steel elevator or stove bolts with their heads ground flat, and ferrite tubes from common RF protectors slipped over these steel bolts. The coil windings are 40ft of .022 magnetic wire, with all windings wrapped around in the same direction, then the wire pulled back straight after end of the row, insulate this wire length pulled back straight with a piece of electrical tape or heat shrink material to protect the windings from chaffing, and then wound right over all this again, and again in the same direction for the next layer of windings, pull back, insulate, wind again, and so on like this...
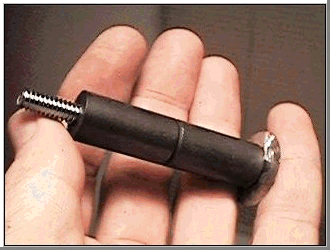
Below is shot of the construction of the motor-cores; with the steel elevator bolt exposed. This steel bolt fits inside ferrite tube also to create the steel/ferrite cores of the electromagnet. These electromagnets work really great, and will lift 3lbs. Make two of these "push" against each other and you will have the simple and unique power dynamics of this motor.
Here is a photo of the windings exposed:
Here is a photo of two ferrite tube slipped over a steel bolt - the basic electromagnetic core of the motor coils:
"PICKUP/SPLATTER COILS"
The pickup/splatter coils to this motor are not connected to the power supply, and induce AC current simply by being right next to the pulsing magnestism of the power coils being turned on and off during the running of the motor. The placement of these clusters is very critical, and actually can increase the speed of the motor when installed if positioned just right. This motor has NO "attraction" or potential "lock-up" form of electromagnetism, so these coils under load do not slow the motor at all.
DIFFERENCE FLUX BRIDGES MAKE:
The permanent magnets working as a "flux-bridge" brought the rpms up from 800 rpm at .5amps current draw when running through a 12V/4a battery to 2000rpm with also .5 amps current draw on the meter.
The torque also increased from almost 1 gram at 900rpm to 6 grams at 900rpm. Quite a big jump in power with no extra power draw!
The explanation of this new power from the Pmagnet flux-bridges is this:
The motor ROTOR coils still contain "excited" current right AFTER being energized for a few milliseconds, so that when the "flux-bridge" is in the rotors path, it will smack oscillations over the Pmagnets, increasing the power with no extra current draw or duty cyle.
Tests have been done on different materials in the "hot spots" of the colliding electromagmets: Steel, ferrite, coils, and finally permanent magnets.
The permanent magnets won the contest by a big majority of what brought the most speed and power in the hotspot. They must face one way in their polarity; the wrong polarity will slow the motor.
HORSEPOWER TESTS:
Tested on a prony-brake rig with 6 grams drag at one foot from the center of the shaft, the prony brake held the motor to 850rpm under this load.
These figures calculate to 1.68 watts output from the shaft. With a 24V input to the motor, and with the same amperage draw, the motor generates 4 watts from the shaft.
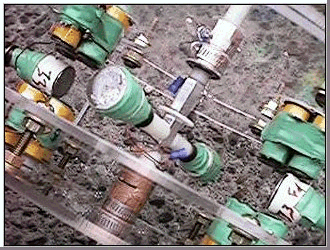
More Photos:
Rotating alnico magnets and rotating clear-plastic timing plate on back of motor which can easily adjust the exact timing and current draw to the motor:
Here is a shot of the mosfet relay that controls the pulse into the motor-coils via the magnetic reed switch that is triggered by the rotating alnico magnet on the back of the motor:
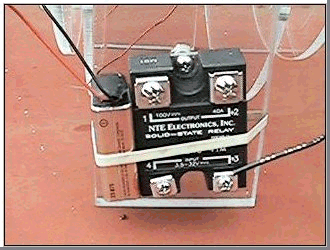
Here are some pictures showing how the power and amp-draw is adjusted in this motor.
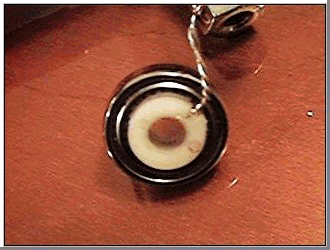
Electric bearing used in this motor made from roller-blade bearing and 1/4inch I.D. nylon "hat" washer. Keep the current of very very low input toprevent these from burning up. Conventional slip-ring assemblies,or brush or carbon contacts can be substitued for the electric bearings to send the jucie through the rotor.
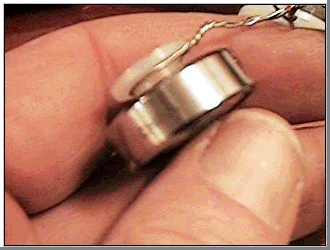
Electric bearing taken apart showing lead wire wrapped around nylon "hat" washer. This lead wire makes contact with the steel bearing race, and is how the bearings work as electrical conductors:
A previous article on this device
email the inventor
Kronzen Motor movie
