An interesting device built late last century and early this century was the device called the Wimshurst electrostatic machine and may yet hold the key to some free energy secrets..
Unfortunately not many are built these days largely superseded by the Van de Graf machine.
But due to the work carried out by the Swiss group building the testatika it may be worth investigating this machine again for yourself.
This machine is basically twin disks rotating at a slow speed in contra rotating direction realtive to each disk.
The disk can be hand driven or machine driven.
I used old gramophone records to build my version.
Two contra rotating disks with foil sections
At the centre middle horizontal position two brushes positioned at front and two at rear to collect and transfer a charge to storage Leyden jars and then hold it or discharge it through a spark gap when sufficient charge has been collected from spinning disks.
A common line connection is shared by two of the other brushes C and D to equal the charge on the both sector plates under these brushes at the same time .
The same happens on disk two but with a common line connection at a 90 degree angle to the front common line connection. E F
Power from position A is fed to the inside metal plate of the Leyden jar and from position B to the other storage capacitor.
There also a common line connection to the outer metal plates of both Leyden jars.
Obtain two old gramophone records approx 30 cm in diameter (smaller ones can be used or a different material could be used.)
Mark each record into 36 equal segments by drawing lines across the diameter in ten degree segments.
Mark two circles on each record about one inch from the outer edge.
the inner circle is dependant on the foil size segments you use and then use these for guides for placement of the metal plates.
Most designs for this machine suggest using al foil but I found by getting some linotype used aluminium plates and it is
easy to cut with scizzors and you probably get some used sheets from a printer for about 60 cents each and two sheets
are all you need. I find also it lasts a lot longer than normal al foil..
The cut aluminium foil must be able to fit into one of the drawn segments on the disk and can be glued into place by any good contact adhesive.
The sectors I used were approx 8cm in length with one end 1cm wide tapering out to 2.6cm with all corners rounded
you will need eighteen for each record a total of 36 cut sections.
Place one in sector leave the next one blank and then repeat
Glue these metal leaves into position and let them set for a couple of weeks or longer depending on your climate.
Make sure all aluminium leaves are flat and no metal sectors plates are sticking up
Later a couple layers of varnish around the plates and onto the record surface will also be needed as well.
On the back of one disk also attach a fibre washer to stop the records for touching one another when in construction and working position.
You will also need to make and glue pulleys to centre of each disk
When the unit is put together these records will be mounted on two separate shafts and be placed back to back
with metal sections place on the outside.
I have heard people have used cotton reels but I prefer to make them out of perspex disks cut with a normal
home drill attachment that cuts holes from 3/4inch to about 2 1/2 inch in diameter.
The drill feed screw should be no more than 1/4 inch and the bored hole can later be drilled out to 5/16 of an inch
(this will fit in on the threaded shaft mounted on the perspex supports)
Cut four large diameter disk and two smaller ones and glue them together using a nut and bolt in the drill hole
to hold the three pieces together to form a pulley.
You may need to smooth off the rough edges on the small disks thus created before glueing together.
I used a lathe but you may get away with using the perspex disk mounted on a drill chuck with a 1/4 inch bolt and sandpapered ( be careful not injure yourself by doing this )
You will also need to make two more set of pulleys for your drive wheel section
If you intend to hand drive this you will need to make these pulleys of a larger diameter
to insure a higher gear ratio to enable the records to rotate at higher speed than hand cranking.
something like ration 3:1 or 2:1 is possible.
When these are mounted one pulley must be fixed in position by tightening nuts around both sides of pulley on threaded shaft
( 5/16 threaded shaft is okay 1/4 is too thin and bends)
The second drive pulley needs to be able to rotate freely.
Connect drive belt as below with drive wheels at right angles to the disks
(These belt driving design for this set up had me puzzled for months and I using an inefficient cross belt in my
set up before someone sent me this idea.)
you will need to make eight collecting brushes for this unit
These will be mounted at positions A and B on perspex mounting at the centre diameter edges mid point horizontal to each disk and they will also be a common position on the rear disk
A further two common connected brushes are needed at position C and D (C may need to set higher and D lower than those shown on the drawing.( blue line)
Brushes E and F shown in white on the drawing are the from the back of the drawing and will need to mounted
at a position of 90 degrees to that of C and D on the front.(white line)
some people have used foil to make the sliding contacts with the foil on the disk for their brushes but I find that
ordinary small springs mounted on small bolts via the thread make excellent brushes I then can bolt and tighten
them into position using nuts to adjust their positions relative to metal sections on the records.

I find this simple to construct using the same linotype aluminium as used for the leaves on the disks.
I always had trouble with the wrapping foil as sold in the shops and find the above easier to handle.
I used normal preserving jars of about 17 cm in height and 8cm in diameter. but any thick glass type
with straight edges may do also.
Cut the metal so that it will go around the outside of the jar and overlap slightly and leave one inch gap at top and bottom
with glass exposed at each end.
Wrap the aluminium around the outside of jar and hold in position with tightly wound insulating tape and then apply some
contact adhesive and let it flow between the metal and the glass.
Apply some self adhesive clear plastic sheeting and cover both the metal and the glass.
For the inside of the jar cut metal the same height but smaller than outside length and form into cylinder using another glass jar of the same diameter and then slip inside of the Jar.
It may pay to have an electrical insulated wire connection to the metal before you do this however.
Your Leyden Capacitor jar is now completed.
You will need to make another one of similar dimension try to keep all the measurements the same.
I hope from what I have written you are able to put a Wimhurst electrostatic generator together and see it working for yourself .If you construct a unit one let me know at the email address below
When I first placed this on this web site I asked for anyone that had also built one. I have recieved this reply with some construction details.
I made the frame out of regular wood, and made the disks out of 2mm thick acryllic plexiglass. I used thin aluminum flashing to make the sectors on my machine, I used 18 on each disk.
I bought a couple of steel pulleys from Sears and two belts to turn the pulleys. I made one belt slightly shorter than the other. The longer one is crossbelted from one disk pulley to the drive pulley (made from PVC pipe and two PVC end plugs).
I used threaded shaft to turn the drive pulley, and a stationairy piece for the disks to rotate on. I placed a 1.5 inch diameter fiber washer between the two disks to keep them level and separated.
The neutralizer/inductor brushes were made of thin gauge wire from a high value wirewound resistor. The charge collectors were two shaped brass rods with aluminum flashing mounted to point in toward the sectored sides of the disks (4 combs in all).
The combs were pointed sharply, and came close, but did not touch the disks. The disks are 32cm in diameter. I have today yielded up to 2cm sparks, which will increase when I add spherical brass balls to the spark gap.
A very comprehensive electrostatic site
Below are some images taken from the previous mentioned website if you are interesting in electrostatics this page is really worth a look
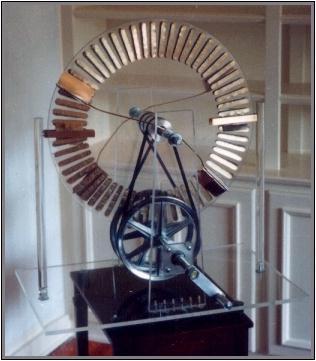
A large Version wimshurst electrostatic generator
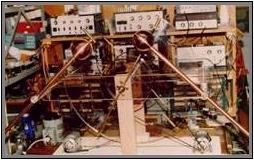
A dual plate wimhurst machine design with no metal leaves

A larger view of the no metal leaf design

Front view of a design using old phono records as disks
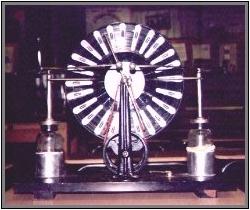
Rear view of a design using old phono records as disks
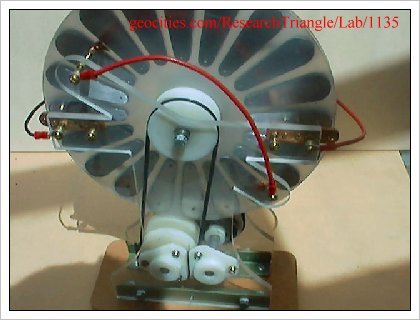
I have been in contact with friend ( Glen Carter ) who has constructed a wimshurst machine using gearing to replace the idea of using a twisted belt to contra rotate the back disk.
Please note none of his contact points actually touch the metal foil sections on either rotating disk.
Both Disks are also mounted on a common axle and the unit itself is very well made.
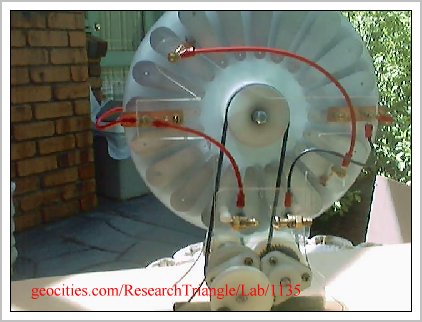
front view of his machine notice the brass spark gaps in the front.
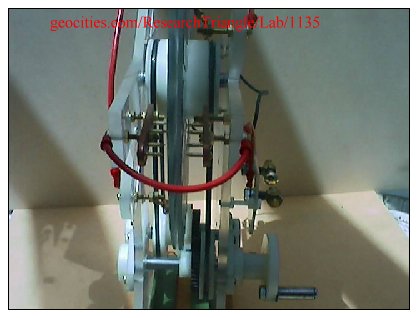
Side view the gearing is hard to see but is at bottom of the front disk behind the rubber drive belt.
Rear view of Glen's design
Related Websites
Making a Van de graaf electrostatic machine
The swiss Ml or testakica free energy machine that could use electrostatic principles
Making a capacitor with water and glass
making a high voltage capacitor simply
The Lorente electro static machine simple and excellent
using high voltage and a radio active element for free power.


